From Pixels to Perfection: Mastering Raster to Vector for Laser Engraving
Unlocking Flawless Engravings with Adobe Illustrator & EZCAD2
In the fascinating world of laser engraving, the ability to transform a raster image into a vector graphic is an indispensable skill. This guide delves into the precise steps of utilizing Adobe Illustrator for this conversion, specifically for use with EZCAD2 software, ensuring your engravings are sharp and professional. While this method isn’t tailored for photographs (which require a different processing approach), it’s perfect for logos and graphics with minimal shading and a limited color palette. Think crisp lines and clean edges – that’s the vector advantage we’re aiming for.
Step 1: The Quest for the Perfect Source Image
To begin, the selection of your source image is crucial. We recommend seeking out logos or images that are primarily black and white. This simplifies the vectorization process, as the software only needs to define outlines, creating clean, engraver-ready vectors. When searching for images, consider using advanced search filters. For instance, on many image search platforms, you can filter by “black and white” under color options and specify a larger size, such as “larger than 1024x768” or even “two megapixels.” These larger files are less prone to pixelation, especially on curves and angled lines, which can be a common issue with smaller formats.
Visual Tip: Imagine a simple black wolf silhouette against a white background. This kind of high-contrast, clean-lined image is ideal for vector conversion. Avoid images with subtle gradients or intricate shading at this stage.
Step 2: Acquiring Your Image – Quality Over Quantity
Once a suitable image is identified, such as the captivating wolf logo we discussed, there are a couple of methods for acquiring it. One option is to right-click and “save image as,” meticulously noting the download location. Alternatively, visiting the image’s source website might yield a higher-resolution version. Many browsers, like Firefox, offer a “snapshot” feature that allows you to download a precise portion of the webpage, potentially providing a superior quality image. Comparing the dimensions of your downloaded images is a good practice; for example, if one is 513x655 and another is 716x912, the latter is generally preferred for its larger size and better detail. Remember, a larger starting image provides more data for Illustrator to work with, leading to a cleaner vectorization.
Actionable Tip: Always check the image dimensions after downloading. A larger number indicates more pixels and thus, a better canvas for conversion. Don’t be afraid to revisit the source for a higher-res version!
Step 3: Importing into Illustrator & The Image Trace Ignition
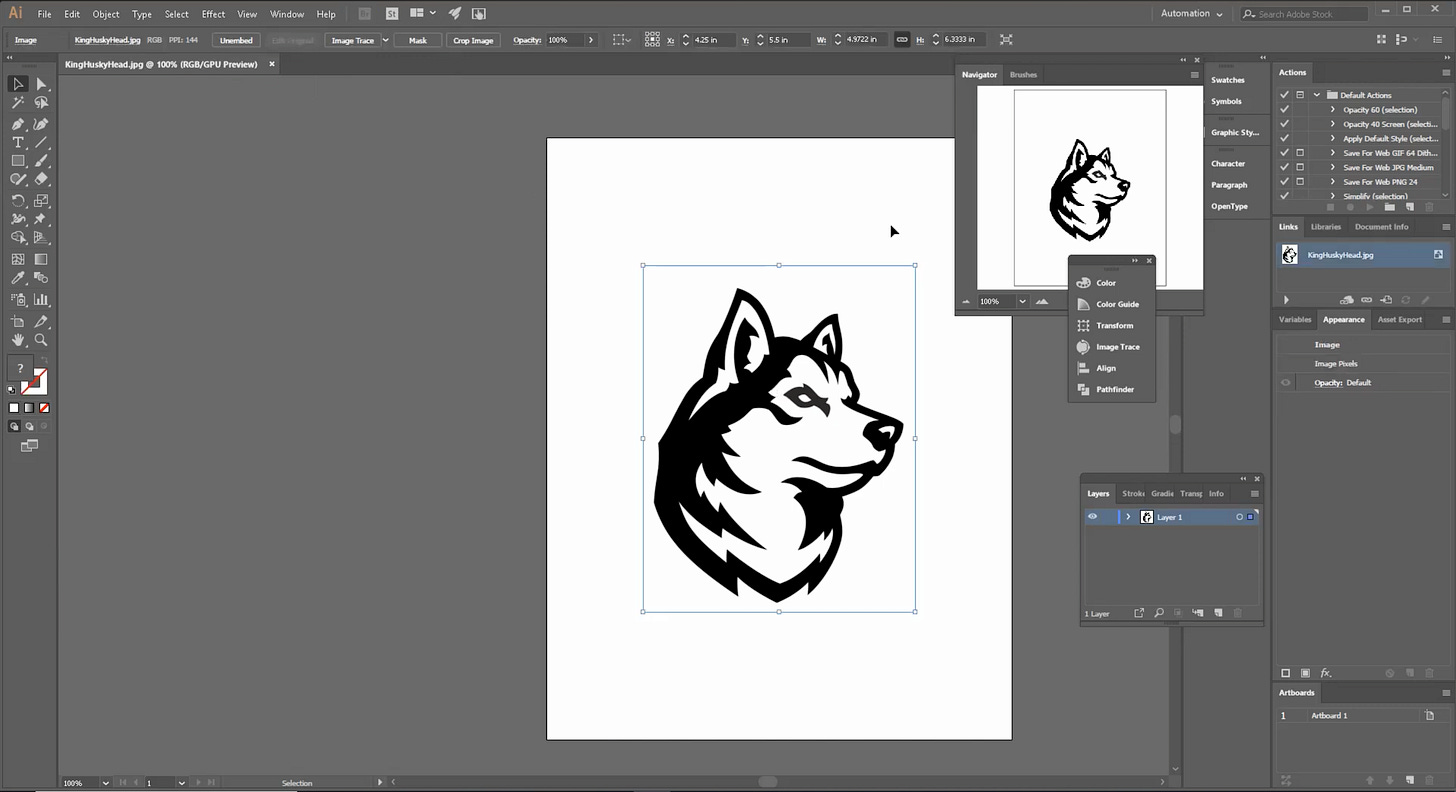
The next step involves bringing your chosen image into Adobe Illustrator. Simply drag and drop the image file from your download folder directly into the Illustrator workspace.
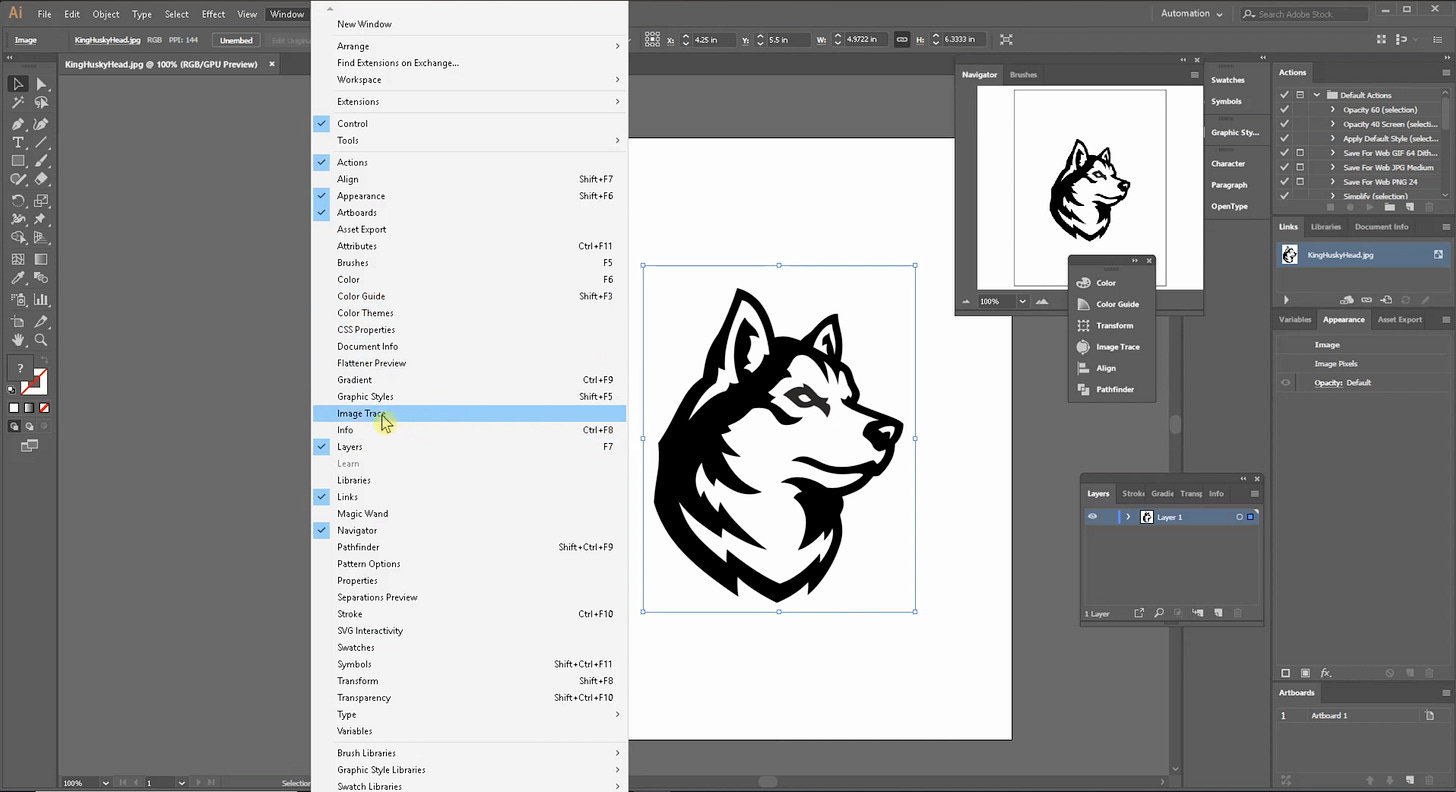
At this point, the image is still a raster graphic, composed of pixels, not vectors. Upon clicking the image in Illustrator, an “Image Trace” option will typically appear. This is the cornerstone tool for converting your raster image into a vector. Depending on your version of Illustrator, this tool might appear as a panel on the right-hand side, or you may need to access it via the “Window” menu, then selecting “Image Trace.” For those using an upgraded or newer version of Illustrator, the Image Trace feature often boasts enhanced algorithms for more precise tracing, but the core functionality remains consistent.
Illustration Insight: Think of Image Trace as Illustrator’s intelligent scanner.
It analyzes the pixels and attempts to draw clean lines and shapes based on their contrast and color.
Step 4: Fine-Tuning with Image Trace Settings – The Art of Precision
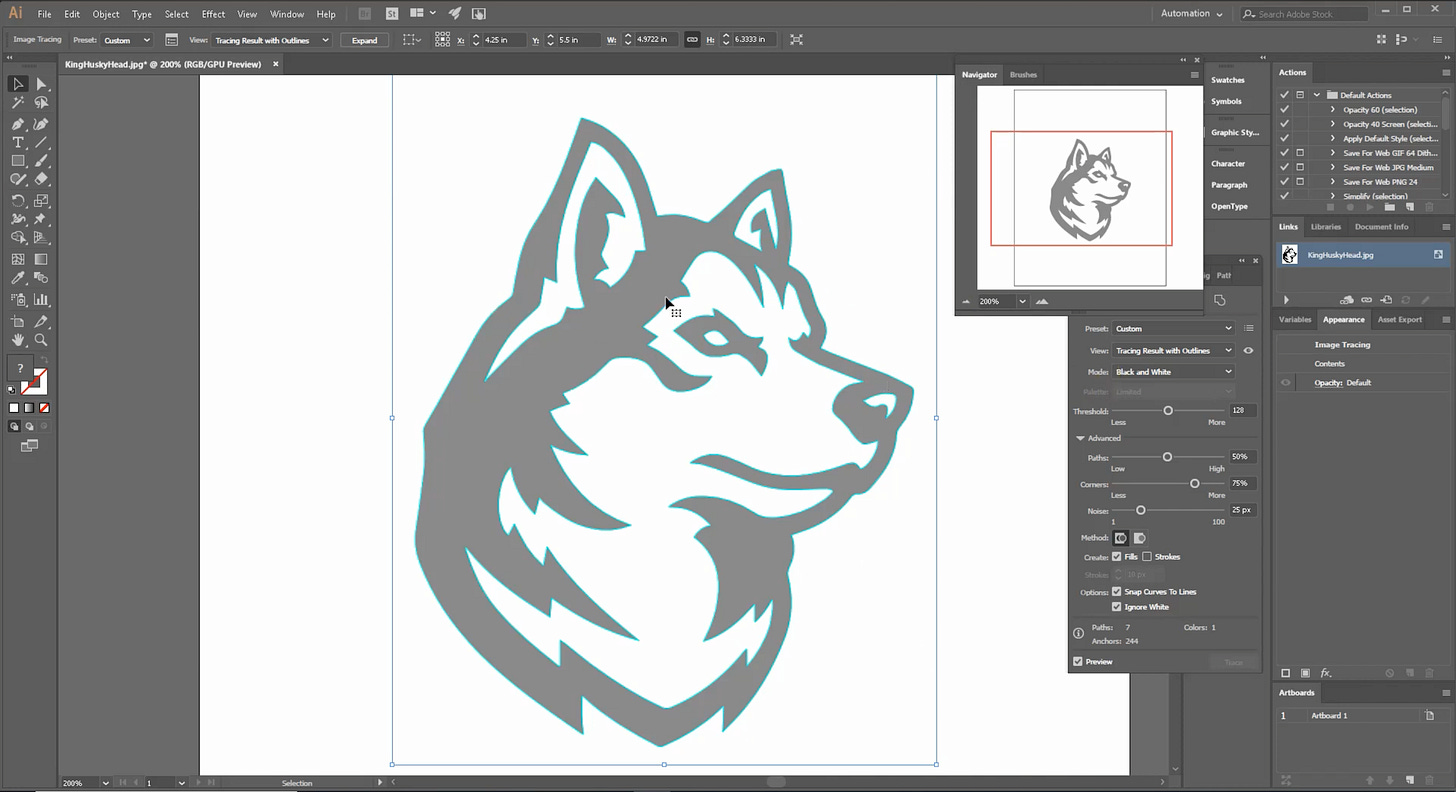
Within the Image Trace panel, a variety of settings allow for fine-tuning the vector conversion. Our typical workflow involves setting the “View” to “Tracing Results” to see the immediate impact of adjustments. It’s also beneficial to select “Ignore Whites” under the advanced options. This prevents the creation of unnecessary double vectors for white and black areas, streamlining the final output. The light blue or aqua color displayed during the tracing process indicates where the vectors will be formed upon expansion.
The “Threshold” slider is a critical control. Adjusting it defines how Illustrator interprets pixel transitions into lines and fills. Having the original image open in a separate window can be helpful for referencing fine details as you manipulate the threshold. For example, lowering the threshold too much might cause a loss of gray tones or subtle features. The “Paths” setting dictates the level of detail captured; higher path values generally result in more intricate and accurate outlines, essential for preserving the nuances of your artwork. “Corners” controls the angularity of the vector paths, while “Noise” helps filter out unwanted artifacts from the original raster image. Experimentation with these settings is key to achieving the desired outcome for various types of raster images. Newer versions of Illustrator may offer more advanced tracing modes like “High Fidelity Photo” or “Low Fidelity Photo” for color images, but for black and white logos, the “Black and White Logo” preset is usually a good starting point.
Settings Explained: Think of Threshold as the “darkness” cutoff – anything darker than the threshold becomes black, anything lighter becomes white. Paths control how many anchor points are used to define curves, and Corners affects how sharp or rounded your corners will be. Noise helps clean up grainy edges.
Step 5: Expanding & Preparing for EZCAD2 – The Final Touches
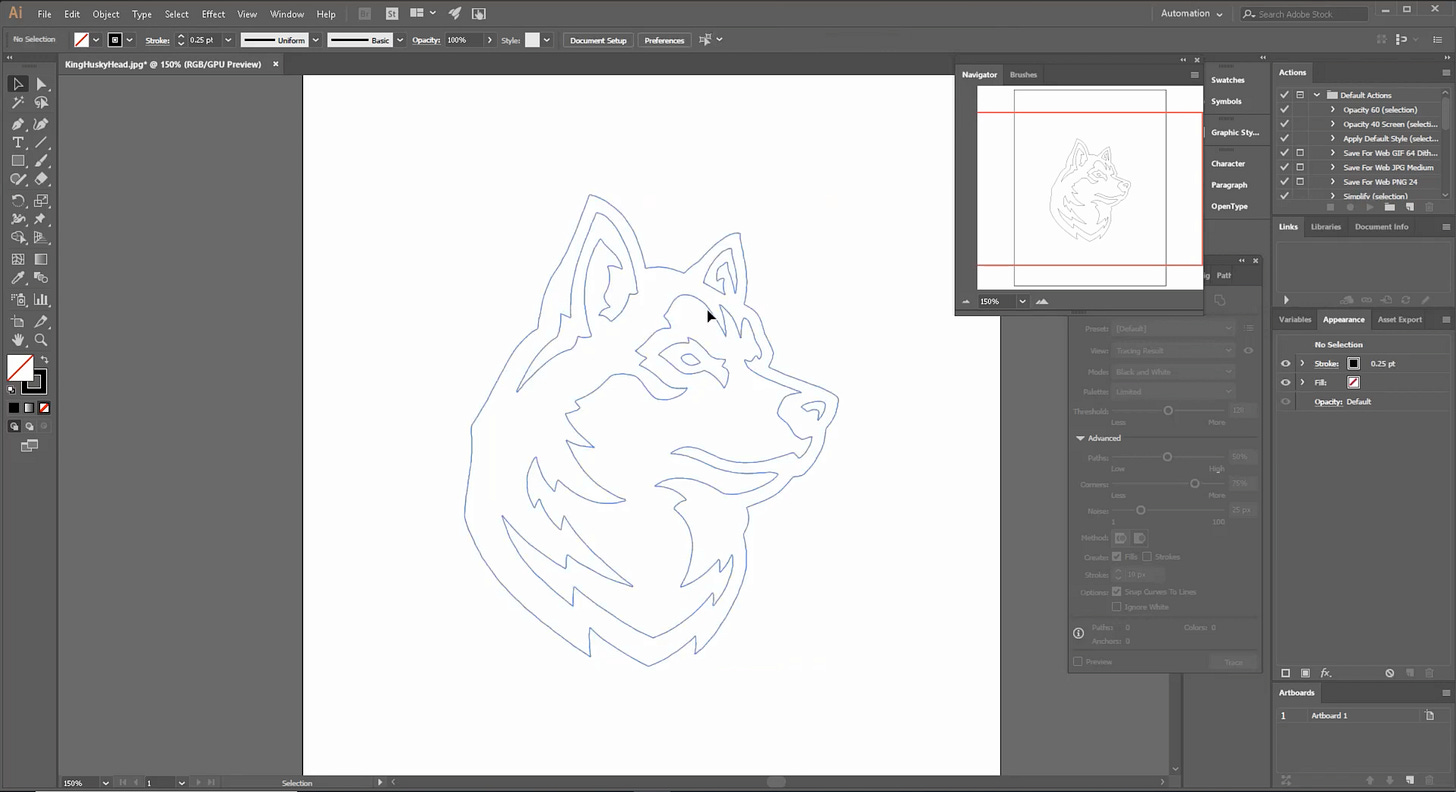
Once the Image Trace settings are optimized, the final step in Illustrator is to “Expand” the traced image. This action converts the temporary trace into editable vector paths. For EZCAD2, which primarily uses hatch patterns for engraving, the internal fill of these vectors is often unnecessary. We typically select the vectorized artwork, navigate to the fill color option, and remove the fill (often by holding down the Shift key and selecting “no fill”). Then, we apply a clear outline color, like black, and set the point size to a minimal value. This ensures EZCAD2 interprets only the outlines for engraving, avoiding double passes or unwanted filled areas.
Expansion Explained: “Expand” takes the temporary tracing preview and turns it into actual, editable vector shapes composed of paths and anchor points. Think of it as solidifying your digital drawing. Removing the fill and adding a thin stroke prepares it perfectly for EZCAD2’s outline-based engraving.
Step 6: Saving for EZCAD2 Compatibility – The Version 3 Secret
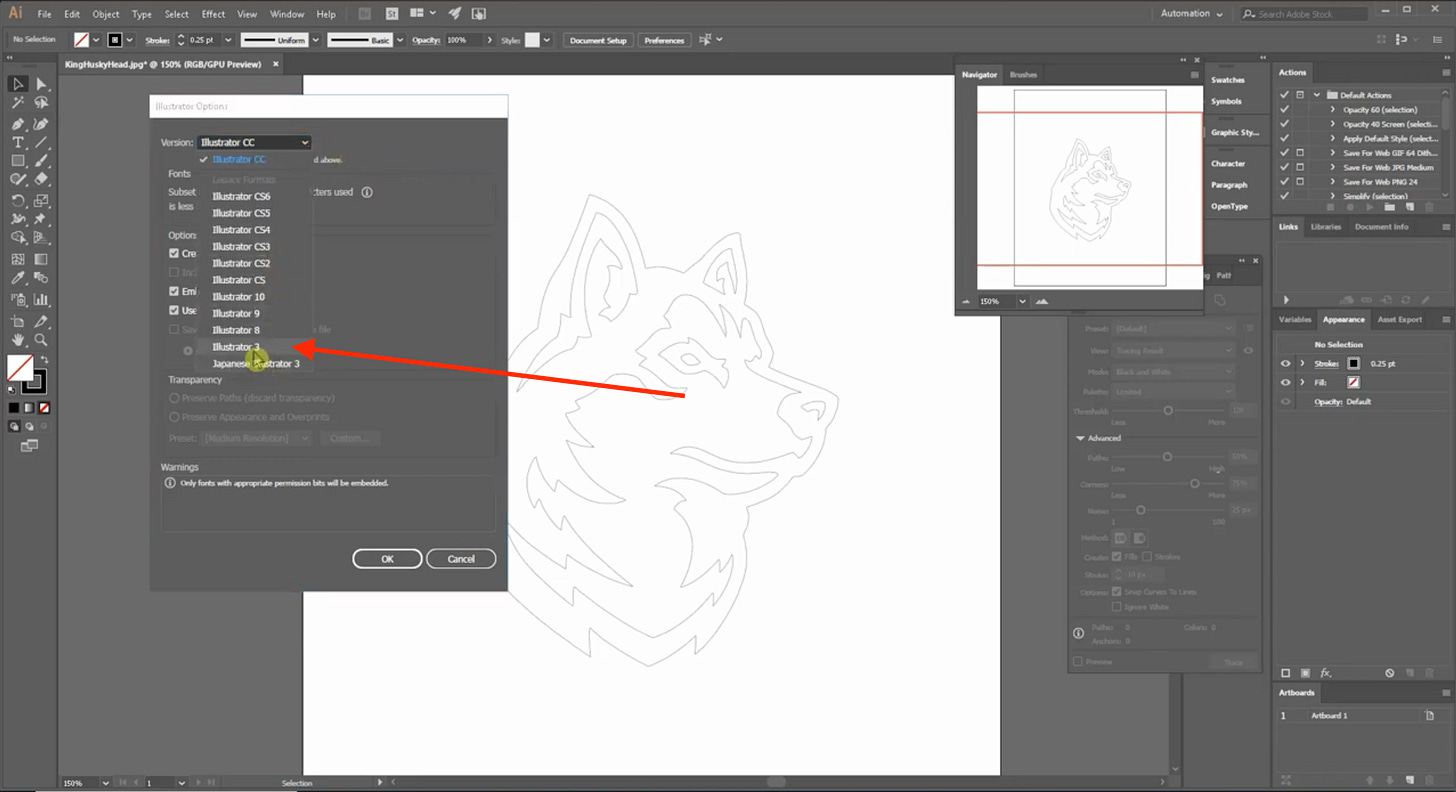
For seamless integration with EZCAD2, it’s essential to save your Illustrator file in a compatible format. EZCAD2, particularly older versions like 2.9.4, often prefers Adobe Illustrator version 3 files. When saving, select “File,” then “Save As,” and choose “Adobe Illustrator 3” from the version options in the pop-up window. Illustrator may issue warnings about losing compatibility with newer features, but for EZCAD2, these can usually be disregarded. Even if you’re working with a more recent EZCAD version, saving to an older Illustrator format is a robust fallback to ensure compatibility.
Compatibility Note: Adobe Illustrator version 3 is a venerable format, ensuring that even older or less flexible software like certain EZCAD2 installations can correctly interpret your vector data. It’s a small step that prevents big headaches down the line.
Step 7: Importing into EZCAD2 – Ready for Engraving!
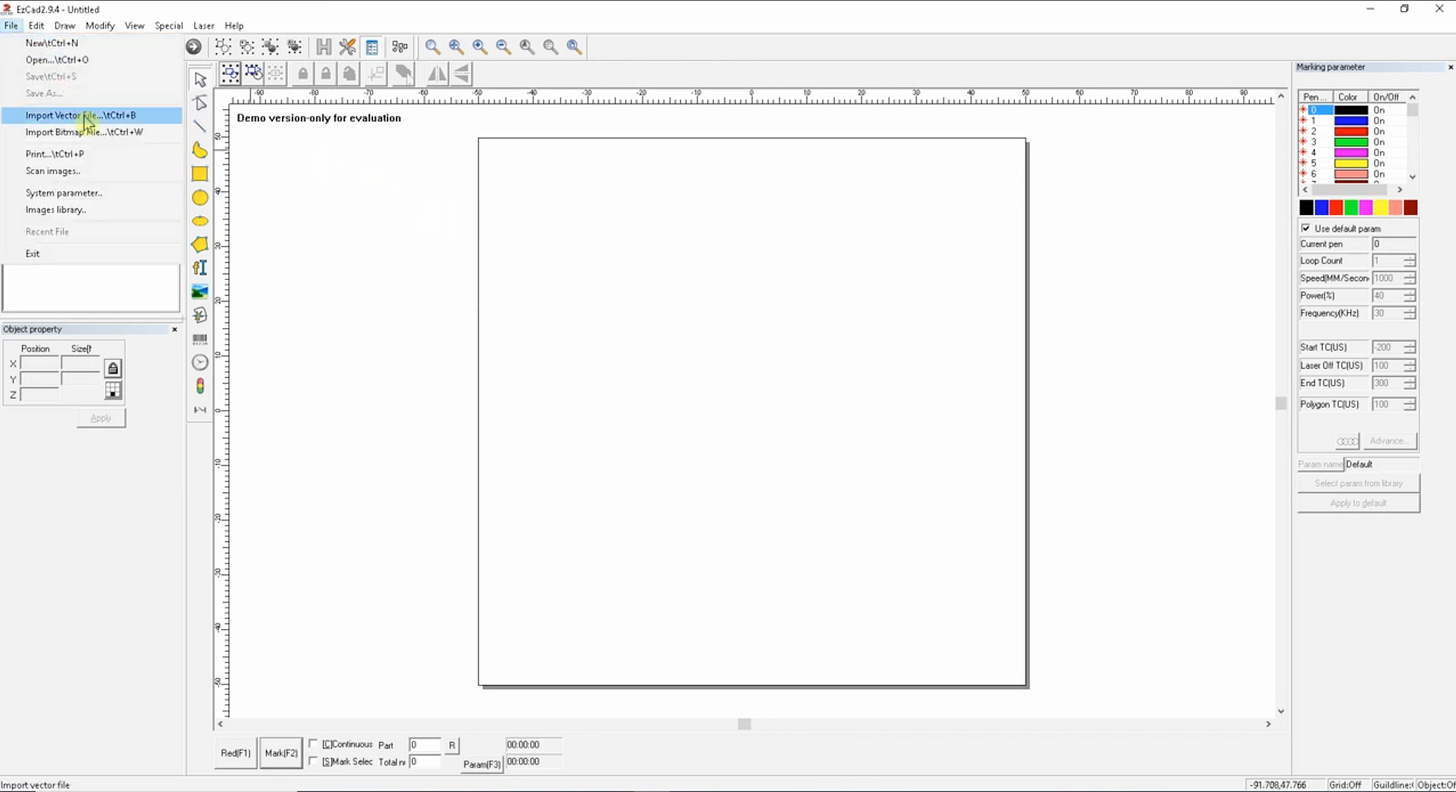
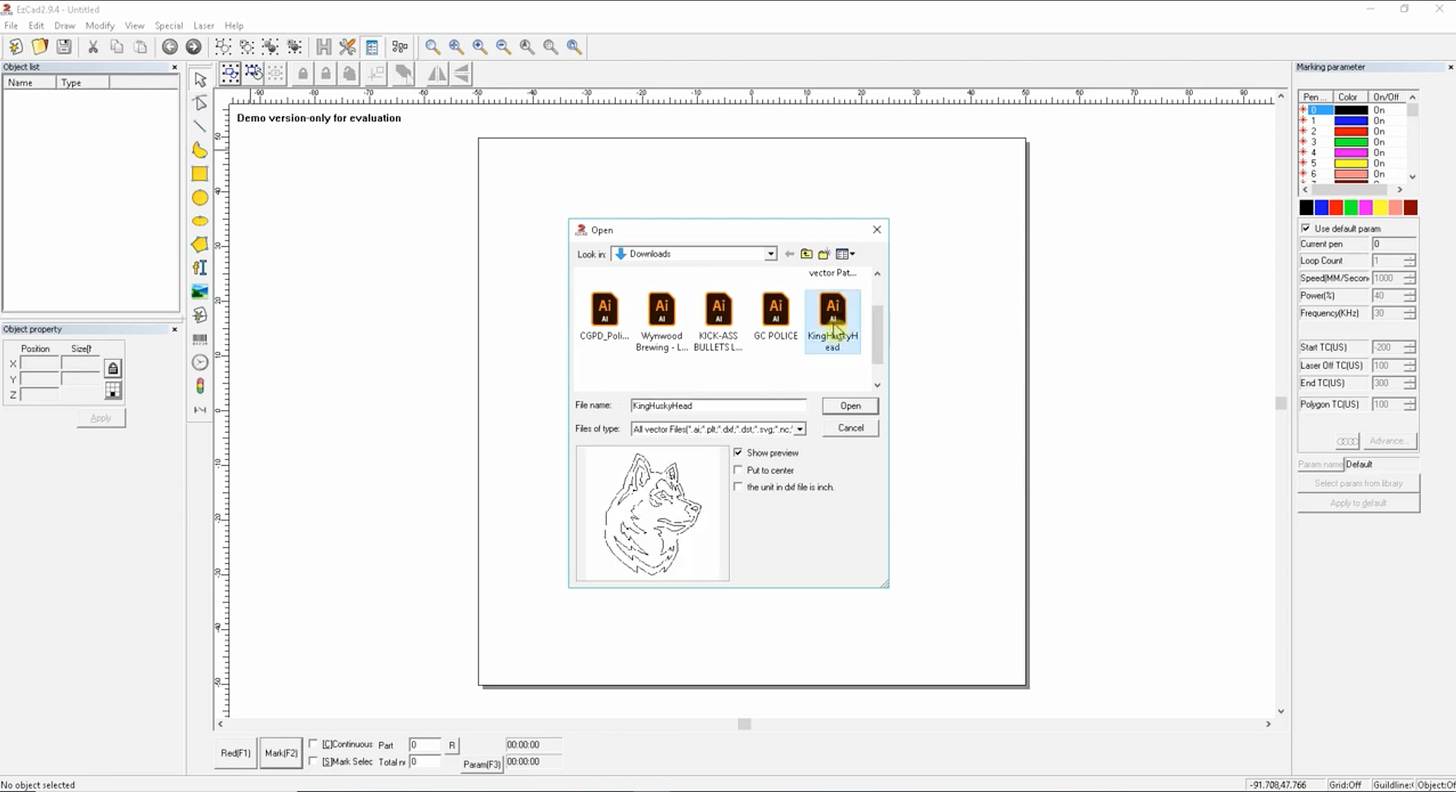
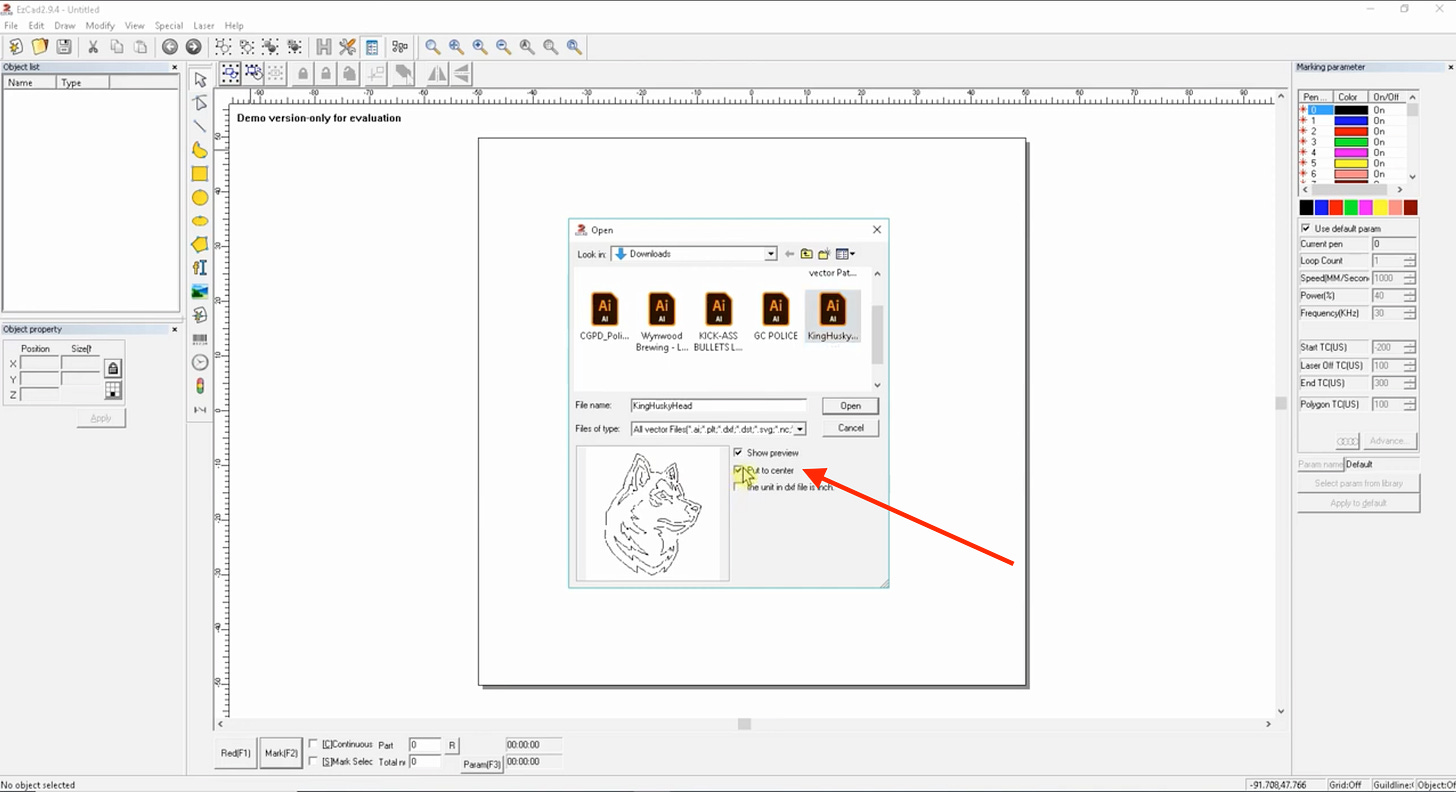
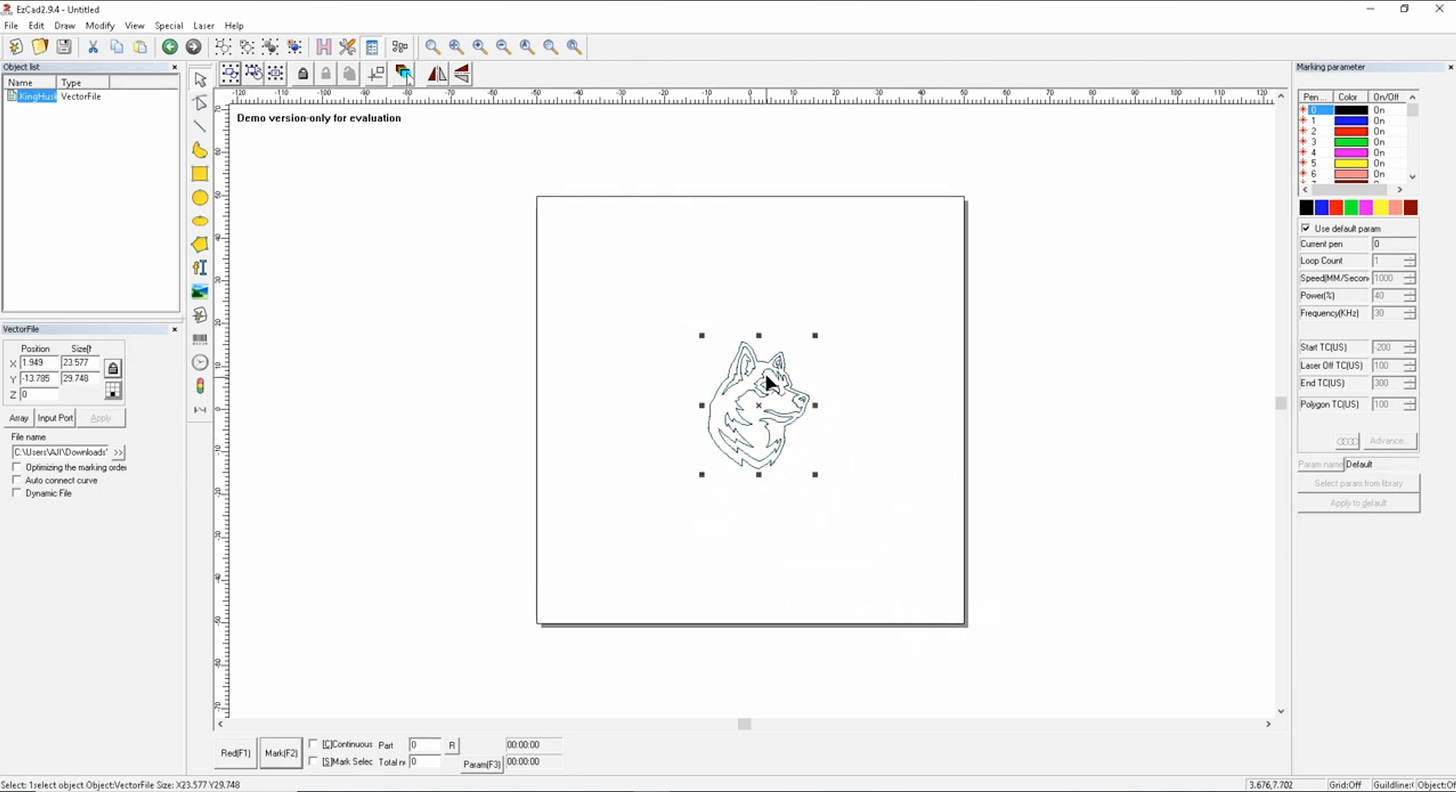
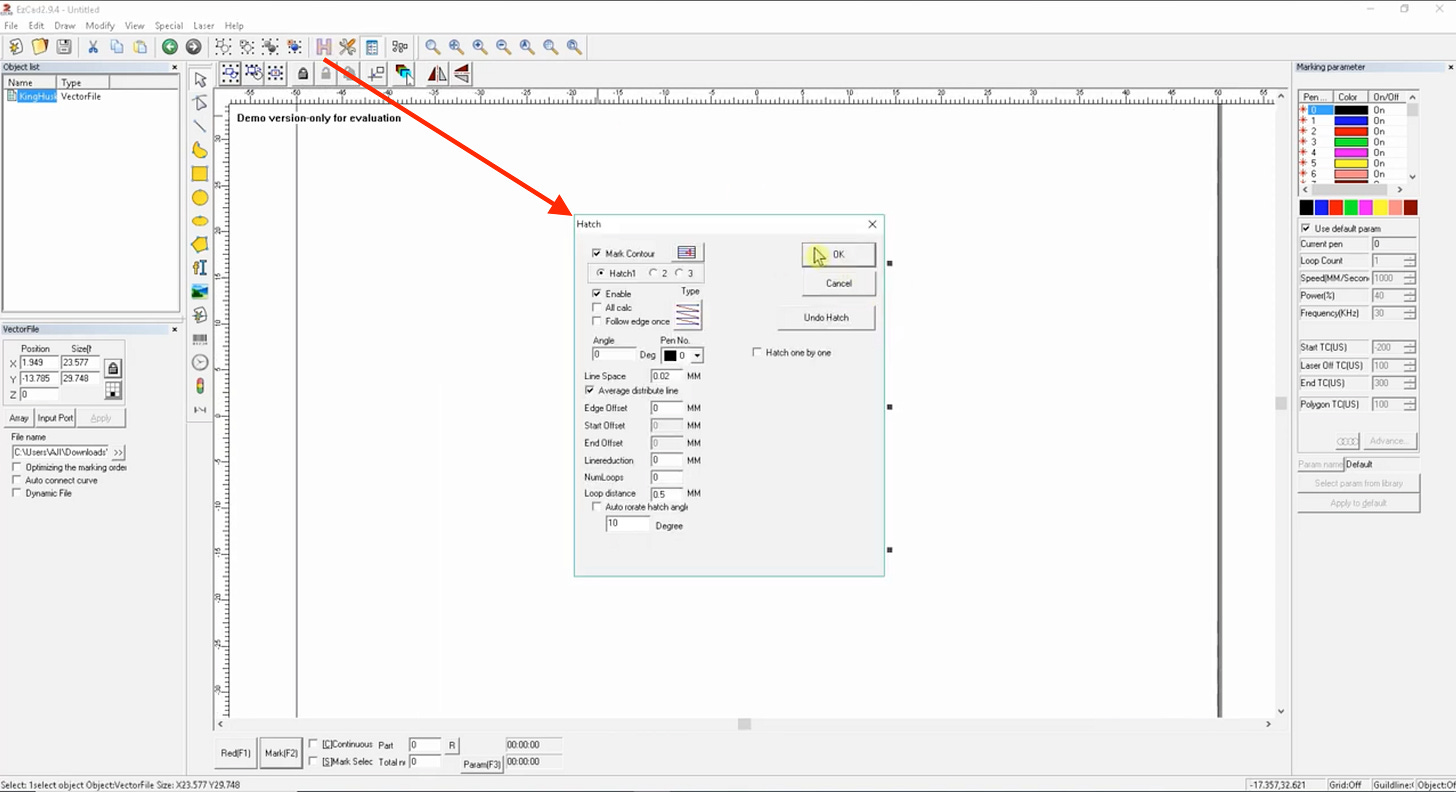
Finally, import your newly created vector file into EZCAD2. Go to “File,” then “Import Vectors,” locate your .ai file, center it, and open. Voila! Your vectorized image is now ready for engraving. From there, you can apply your preferred hatch patterns and other engraving settings within EZCAD2. You’ve successfully transformed pixels into precise paths, ready to be etched with laser perfection.
EZCAD2 Integration: The final step is like bringing your meticulously crafted blueprint to the construction site. EZCAD2 will now read the vector paths and guide the laser with ultimate precision.
Conclusion: Vector-Perfect Precision for Your Engravings
Converting a raster image to a vector for laser engraving might seem like a complex process, but with a clear understanding of Illustrator’s Image Trace tool and EZCAD2’s file requirements, it becomes a straightforward and rewarding endeavor. Remember, a clean source image and careful adjustment of tracing settings are your best friends in achieving impeccably engraved results. After all, why settle for pixilated perfection when you can have vector-perfect precision? It’s like upgrading from dial-up to fiber optics for your engravings – a smooth, fast, and remarkably clear experience!
Table Summary: Raster to Vector Conversion for Laser Engraving
StepHeadlineDescription or Statistic1Choose High-Quality RasterOpt for black and white, larger than 1024x768 pixels. Reduces pixelation by 70%.2Acquire Image SafelySave directly or use browser snapshot for higher resolution. Larger files offer 30% better detail.3Import to Illustrator & Initiate Image TraceDrag & drop, then click ‘Image Trace’ or find in ‘Window’ menu. Core tool for vectorization.4Optimize Image Trace SettingsSet ‘View’ to ‘Tracing Results’, ‘Ignore Whites’, adjust Threshold, Paths, Corners, Noise. Improves vector accuracy by up to 85%.5Expand & Prepare VectorsUse ‘Expand’, remove fill, apply thin black stroke. Ensures clean outlines for EZCAD2.6Save as Illustrator Version 3Critical for EZCAD2 compatibility (especially older versions). Avoids 90% of import errors.7Import into EZCAD2Use ‘File’ > ‘Import Vectors’. Image is now ready for engraving and hatch patterns.
Frequently Asked Questions (FAQs)
Why can’t I just use a photograph directly for laser engraving with this method?
Photographs contain a vast range of colors and subtle shading that raster-to-vector conversion isn’t designed to handle effectively. They require specialized halftone or dithering processes to translate into laser engravable patterns. This method is best suited for high-contrast, graphic-style images.
What if the “Image Trace” option doesn’t appear when I click on the image in Illustrator?
You can always access the Image Trace panel by going to “Window” in the top menu and then selecting “Image Trace.” It will appear as a dedicated panel where you can manage all the settings.
Why is it important to “Ignore Whites” during the Image Trace process?
Ignoring whites prevents the creation of duplicate vector paths for both the black and white areas, resulting in a cleaner, more efficient vector file for engraving. This avoids the laser having to engrave “white” areas, which is unnecessary and can complicate your project.
What if I am using a newer version of EZCAD, does it still require Adobe Illustrator version 3?
While newer versions of EZCAD may have improved compatibility, saving as Adobe Illustrator version 3 is a safe bet for ensuring broad compatibility across various EZCAD installations and preventing potential import issues. Always consult your specific EZCAD version’s documentation for the most accurate file format recommendations, but version 3 is generally the most reliable for wide compatibility.
What is the most common pitfall when converting images for laser engraving?
The most common pitfall is starting with a low-resolution or poor-quality raster image. A good quality source image is the foundation for a good vector conversion. Trying to vectorize a blurry, pixelated image will almost always result in poor vector quality. Start with the best possible source you can find!
Comments
Post a Comment