Unlocking Precision: Calibrating Your Laser for Perfect Engravings
Achieve Flawless Engraves Every Single Time
Welcome back, laser enthusiasts! In the intricate world of laser engraving, precision isn’t just a buzzword—it’s the bedrock of quality. We’ve previously delved into the critical role of laser activation and deactivation timings, along with the ‘end cut’ duration. These subtle yet powerful settings profoundly influence the hatch pattern and dictate the exact moments your laser engages and disengages with your material. To truly master these configurations, a reliable visual reference is not just helpful, it’s absolutely indispensable for verification and comparison. Imagine a conductor ensuring every instrument hits its note precisely; that’s the level of synchronization we aim for with your laser.
The quest for impeccably clean engravings, with perfectly aligned sidewalls and a uniformly flat bottom, often boils down to fine-tuning these critical timing parameters. This guide will walk you through the Transcendent’s preferred method, a step-by-step approach to calibrating your laser’s engraving process, ensuring your projects consistently achieve professional-grade results.
Step-by-Step Calibration: Your Blueprint for Perfection
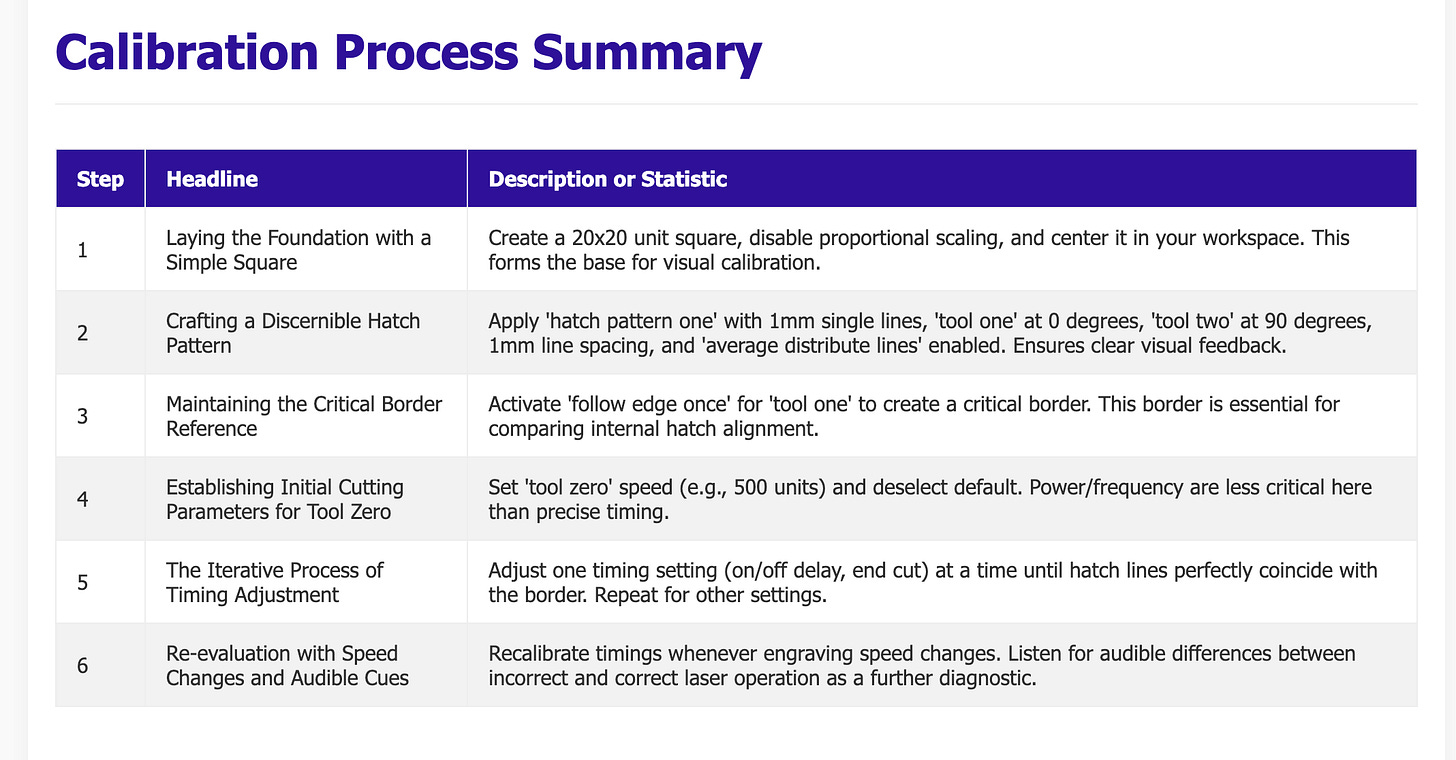
Achieving consistently superior results for deep engravings requires a meticulous approach. The Transcendent’s preferred method simplifies this by focusing on clear visual feedback. Follow these steps to ensure your laser’s timing is perfectly dialed in:
Step 1: Laying the Foundation with a Simple Square
To begin, we initiate our calibration process by creating a fundamental geometric shape: a simple square. This square will serve as our primary visual reference for all subsequent adjustments.
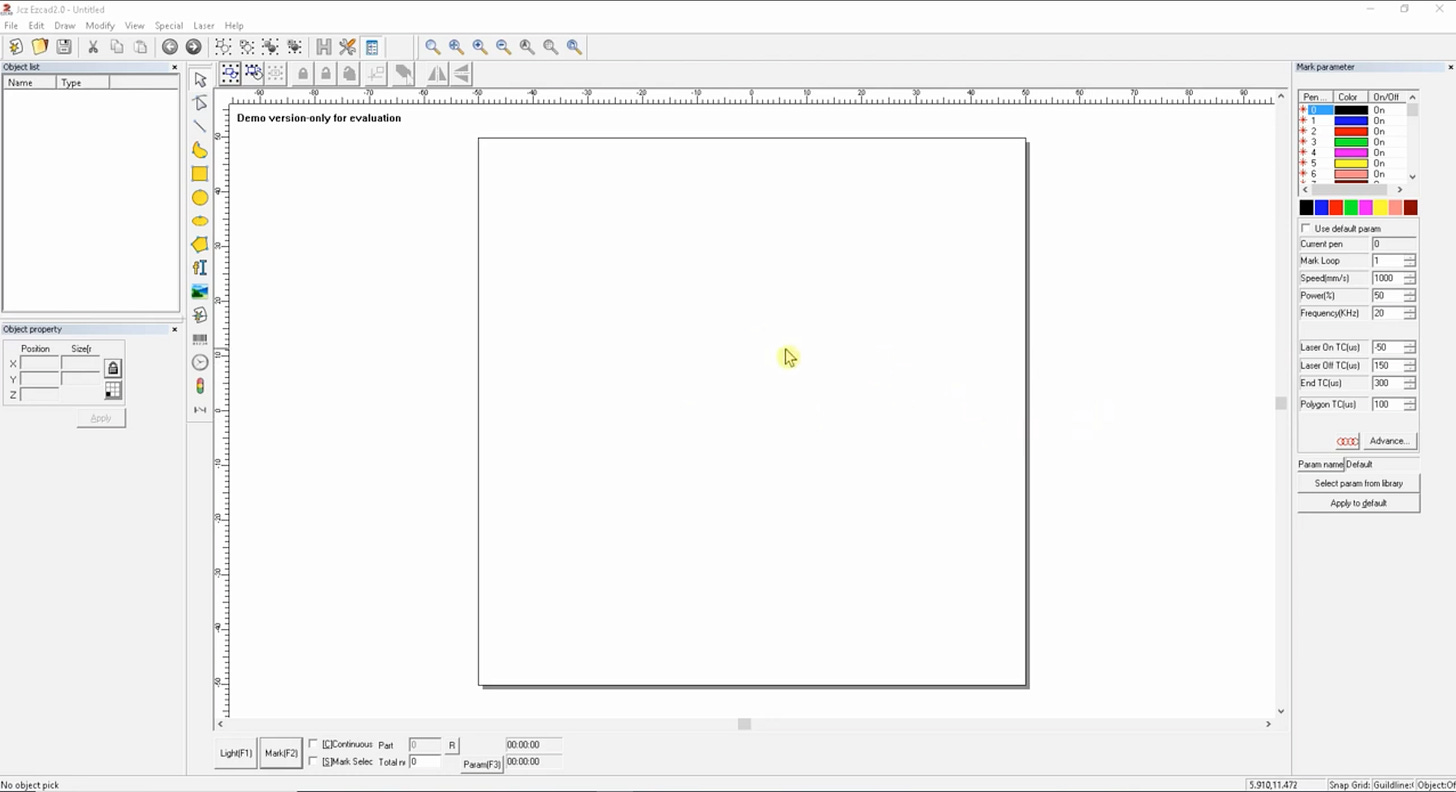
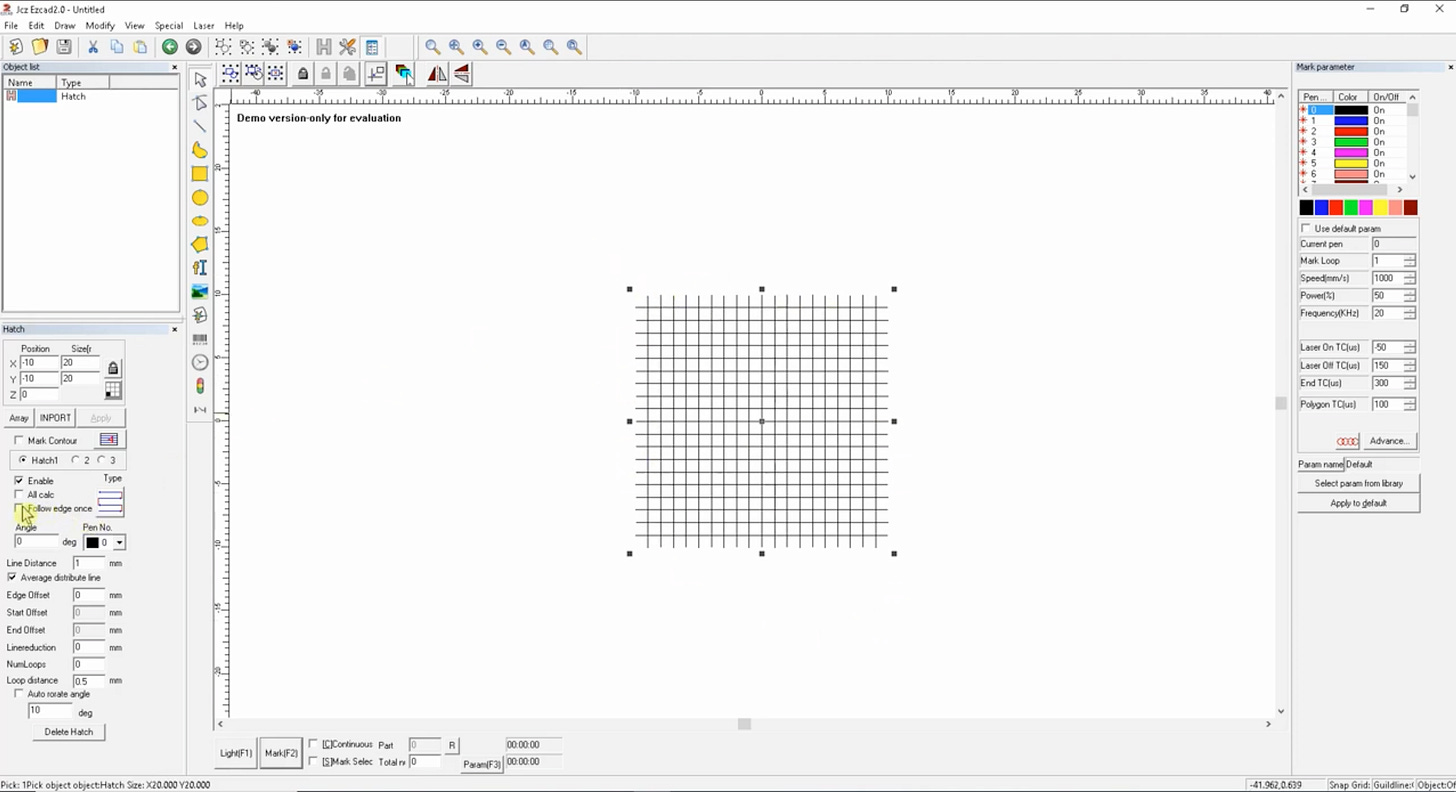
Add a Square Shape: Open your laser software and add a basic square to your workspace.
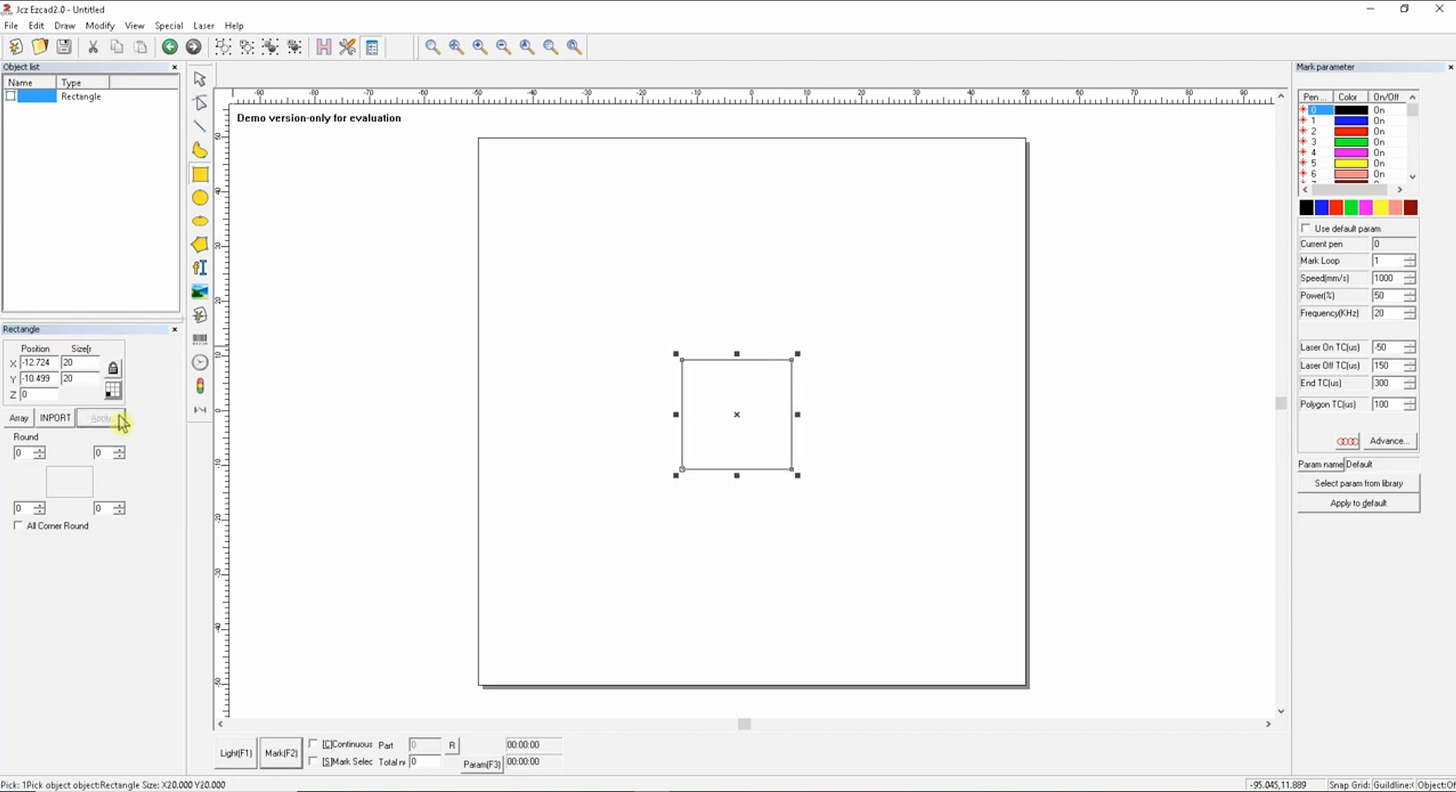
Disable Proportional Scaling: Crucially, disengage the proportional scaling feature for this square. This allows you to set independent dimensions for its width and height.
Input Precise Dimensions: Enter exact, manageable dimensions for your square. For instance, twenty by twenty units (e.g., 20mm x 20mm or 20in x 20in, depending on your software’s unit system). Apply these changes to solidify the square’s size.
Center the Square: Utilize the pick tool within your software to carefully position this newly sized square at the absolute central point of your workspace. This ensures consistency and simplifies visual inspection.
This initial square is more than just a shape; it’s the canvas upon which we will paint our calibration patterns. Its precise placement and dimensions are vital for accurate comparisons.
Step 2: Crafting a Discernible Hatch Pattern
With our foundation set, the next crucial step is to apply a hatch pattern within this square. This pattern needs to be easily discernible, providing clear visual cues for our timing adjustments.
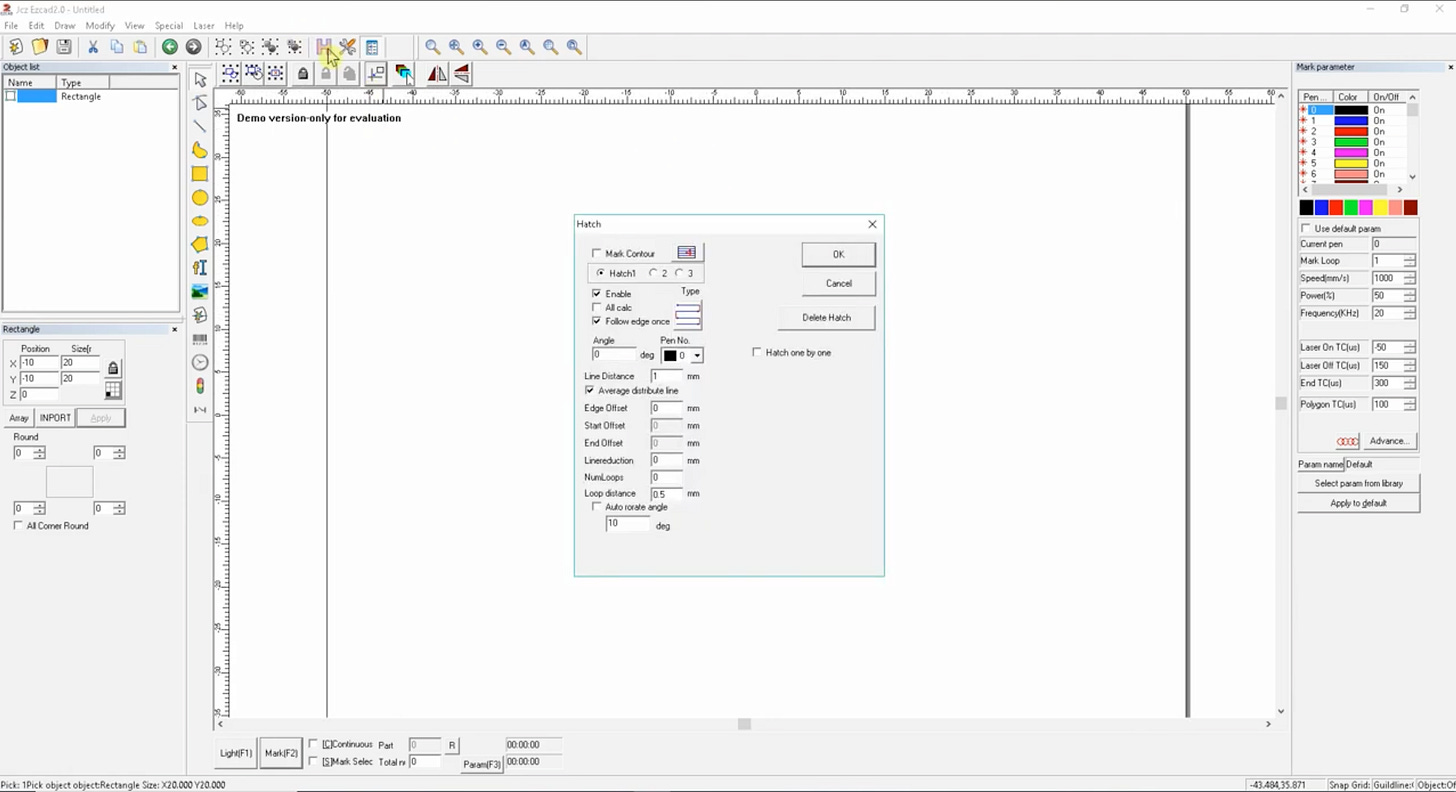
Select Hatch Pattern One: Choose ‘hatch pattern one’ from your software’s options. This pattern is often straightforward and ideal for calibration.
Configure Hatch Length: Set its length to a generous one millimeter. This ensures the individual lines are visible and provides enough detail for observation.
Ensure Single Lines, Both Directions: It is imperative that this pattern consists of single lines, not a zigzag configuration. Additionally, ensure it extends in both directions for comprehensive coverage of the square.
Integrate Tool Two: Activate ‘tool two’ and adjust its angle to ninety degrees. Simultaneously, ensure ‘tool one’ remains at zero degrees. This creates a cross-hatch effect, vital for seeing timing discrepancies.
Consistent Pen and Line Spacing: Both tools should employ ‘pen zero’ with a consistent line spacing of one millimeter. This uniformity is key for accurate visual assessment.
Activate ‘Average Distribute Lines’: To ensure uniform distribution of the hatch lines, activating ‘average distribute lines’ is advisable. This centers the spacing even in irregular shapes, preventing lines from being pushed to one side.
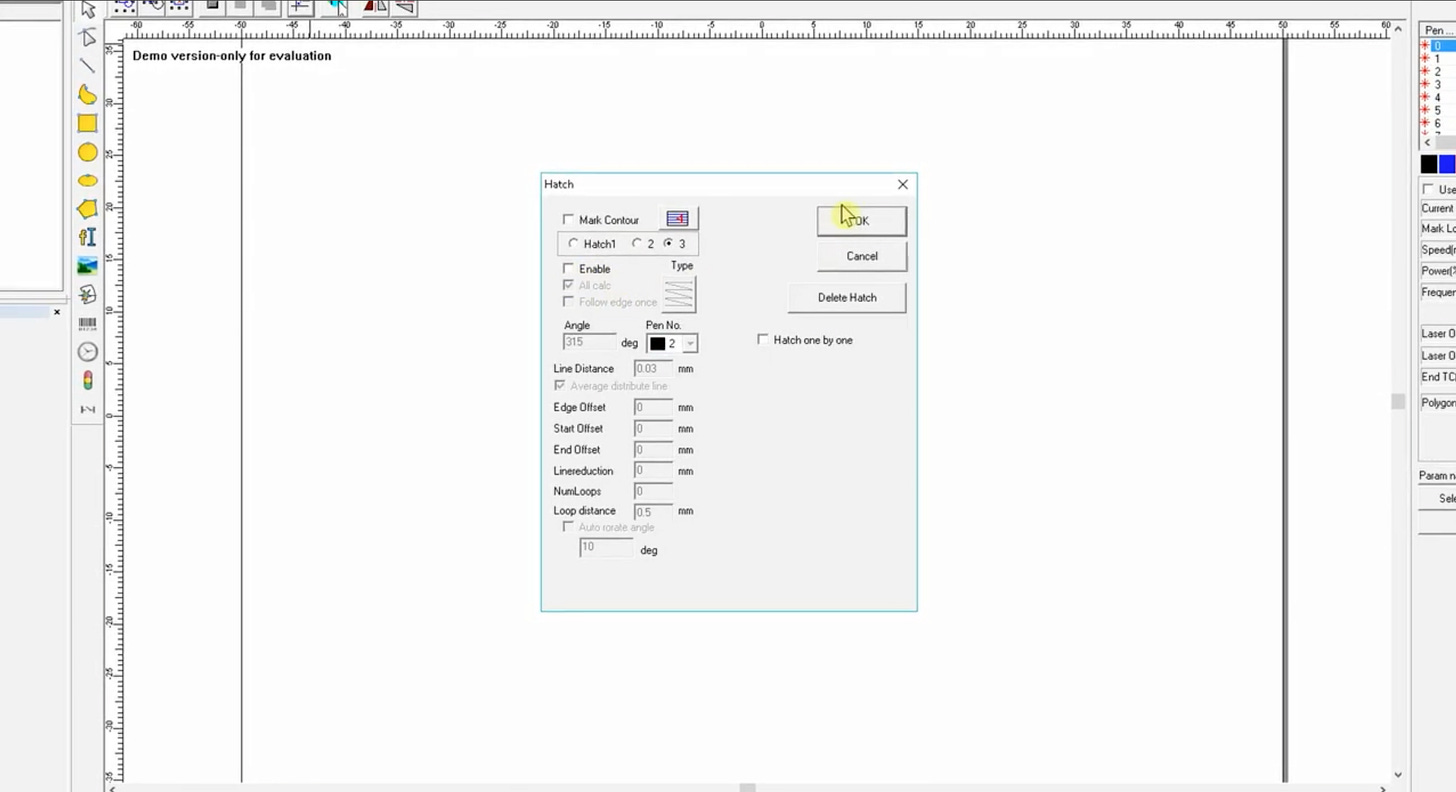
Disable Tool Three: Importantly, ensure ‘tool three’ remains disabled to prevent any inadvertent inclusion in the calibration process.
Finalize Selections: Click ‘OK’ to finalize these pattern selections and apply them to your square.
This meticulously crafted hatch pattern will, upon engraving, be visible without requiring magnification, though a magnifier will undoubtedly enhance the precision of these timing adjustments. It forms the core of our visual feedback system.
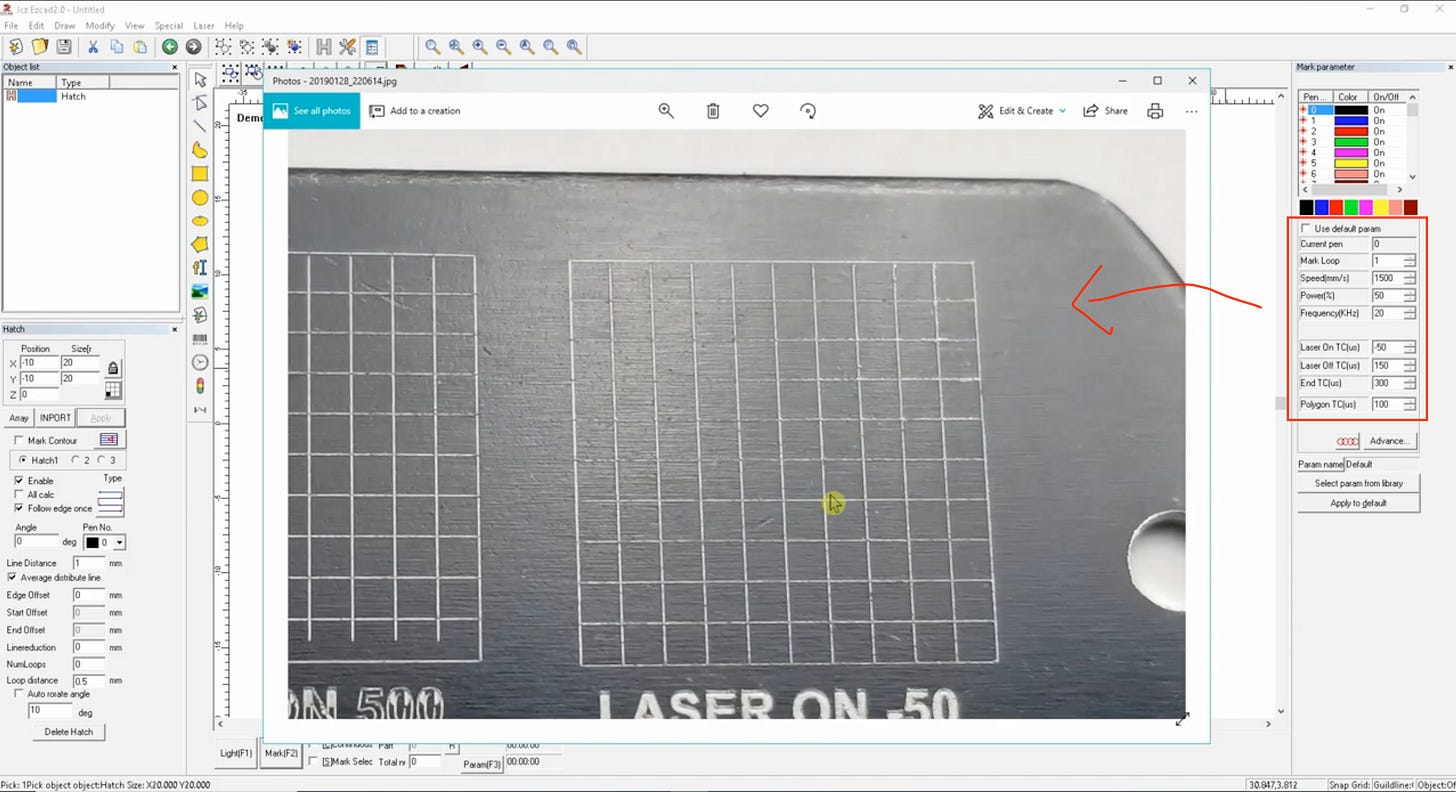
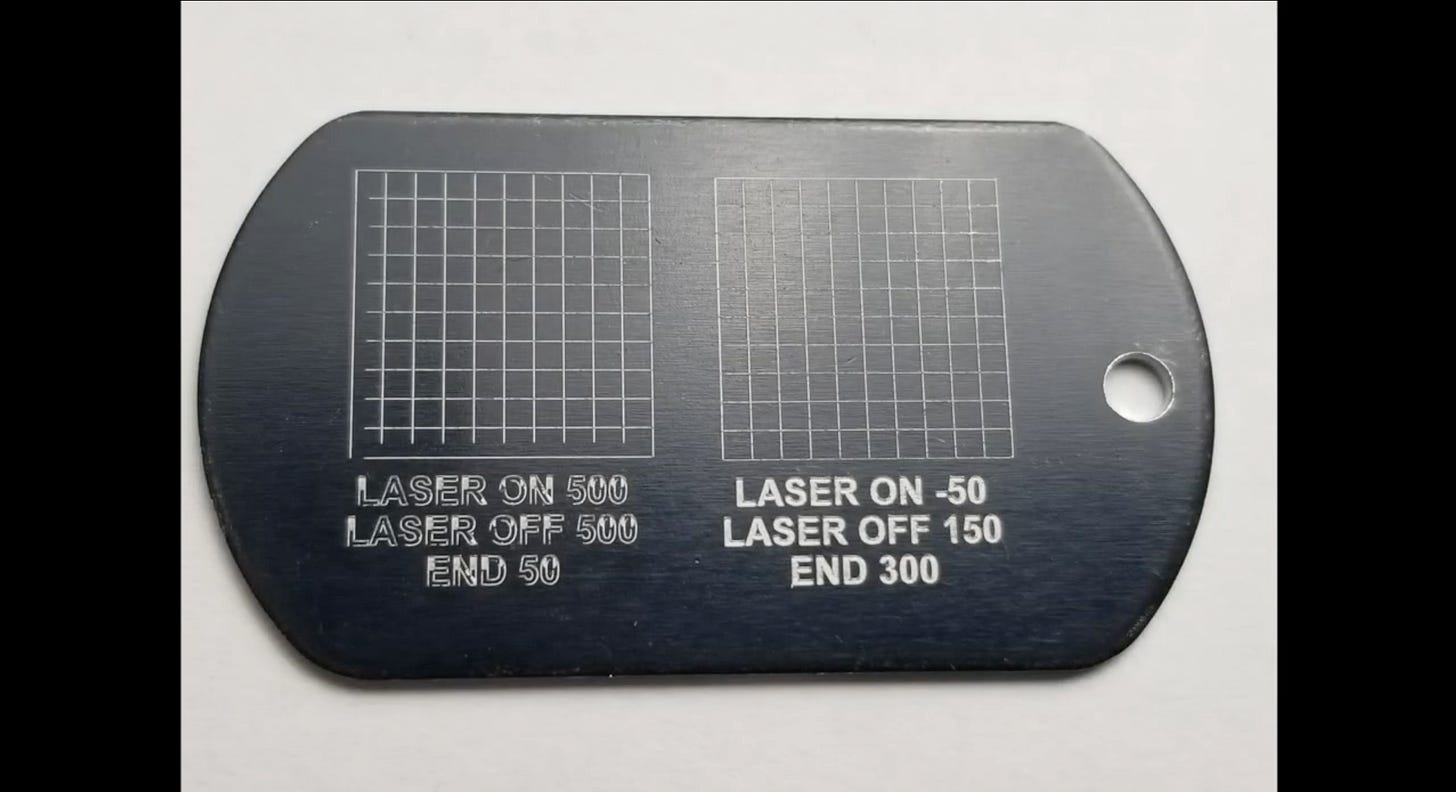
Visual representation of a perfectly calibrated hatch pattern within a square. The lines are crisp, uniform, and align precisely with the border, indicating optimal laser timing.
Step 3: Maintaining the Critical Border Reference
The border of our square is not just an outline; it’s a fundamental reference point against which we will compare the internal hatch lines. Preserving this border is essential for accurate timing adjustments.
Enable ‘Follow Edge Once’: For ‘tool one’ (or your primary engraving tool), ensure that ‘follow edge once’ is selected and activated. This setting creates the vital border around your hatch pattern.
The Importance of the Border: Deactivating this setting will remove the critical border, which serves as a fundamental reference for our timing adjustments. Without it, you lose the baseline for comparison.
Apply Changes: Maintain ‘follow edge’ in an active state and apply the changes to your setup.
This border provides the visual anchor for observing how well your laser’s on/off timings are synchronized. Any misalignment between the internal hatch and this border will immediately signal a need for adjustment.
Step 4: Establishing Initial Cutting Parameters for Tool Zero
Before the actual engraving, we need to establish the basic parameters for ‘tool zero’ – typically the cutting operation or the initial pass that defines the border.
Deselect ‘Use Default’: When proceeding with the cutting operation, establish the parameters for ‘tool zero’. Typically, this involves deselecting ‘use default’ to gain manual control.
Configure Speed: Configure the speed at which this pen will operate, for example, five hundred units. The Transcendent generally recommends maintaining this speed for consistency during calibration.
Power and Frequency: The exact power settings and frequency will hold less significance at this stage compared to the timing adjustments we are about to make. On our specific machine, the settings are configured at negative fifty, one hundred fifty, and three hundred. These values, however, will vary considerably across different machines.
Upon acquiring EasyCatch software, you may find some pre-set values that offer a good starting point. However, achieving impeccably clean engravings or perfectly aligned sidewalls with the border often necessitates fine-tuning these critical timing parameters. This misalignment occurs because the timing must be exceptionally precise.
Step 5: The Iterative Process of Timing Adjustment
This is where the true art of calibration comes into play. The process is iterative, focusing on adjusting one setting at a time while observing the results.
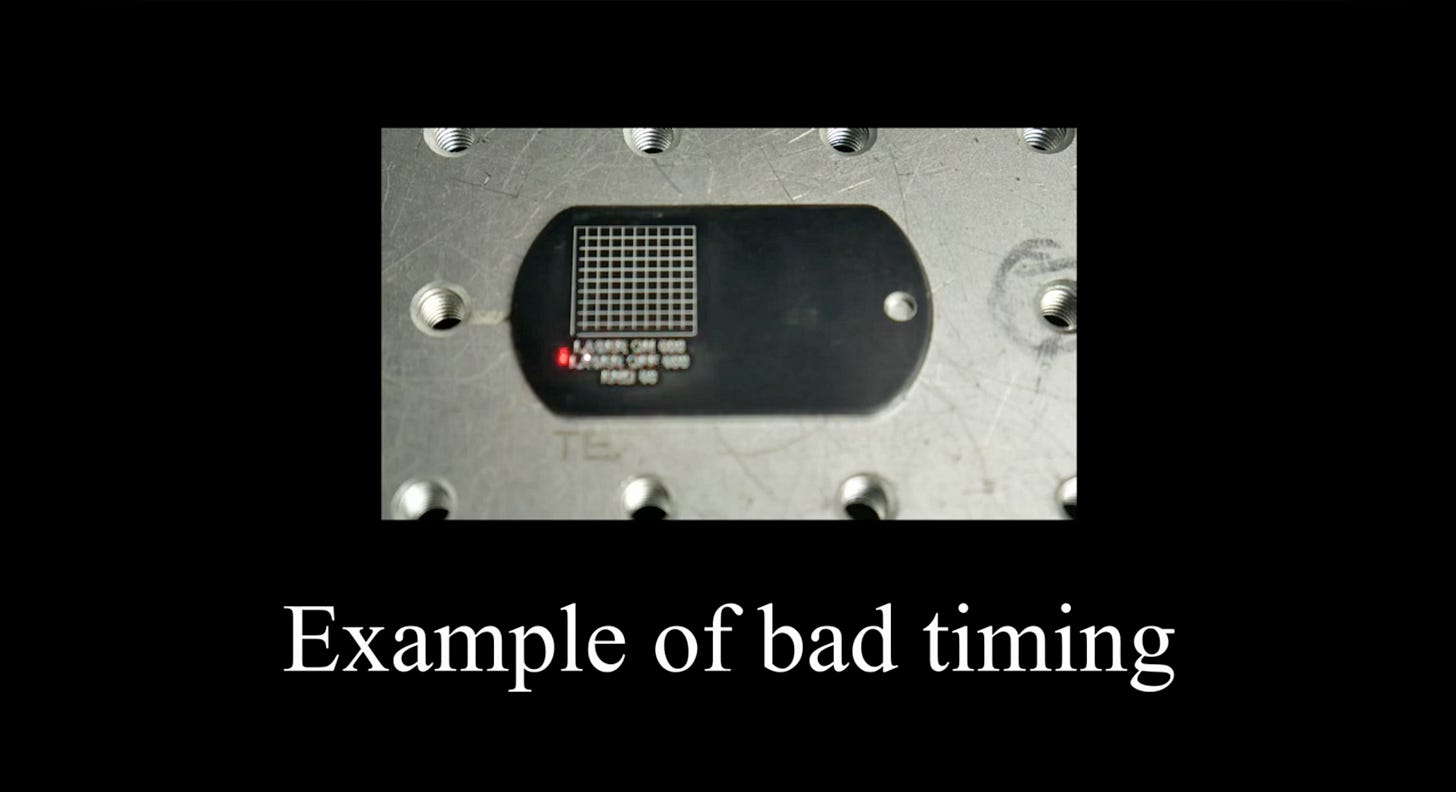
Observe Misalignment: The Transcendent has conducted illustrative examples where these timing parameters were intentionally skewed. In such cases, the hatch pattern no longer aligns with the border, and the border itself might even appear disconnected at the base. This severe timing discrepancy prevents the letters or fills from being properly rendered.
Adjust One Setting at a Time: The calibration process involves adjusting one timing setting (e.g., ‘laser on’ delay, ‘laser off’ delay, or ‘end cut’ duration) at a time.
Achieve Perfect Coincidence: Meticulously tweak the chosen setting until the internal hatch lines perfectly coincide with the border. Use a magnifier if necessary to observe the minutest details.
Move to the Next Setting: Once the first setting yields perfect alignment, proceed to adjust the next setting, whether it’s the ‘off’ or ‘on’ timing. Continue this precise tweaking until the lines precisely match the border in that dimension.
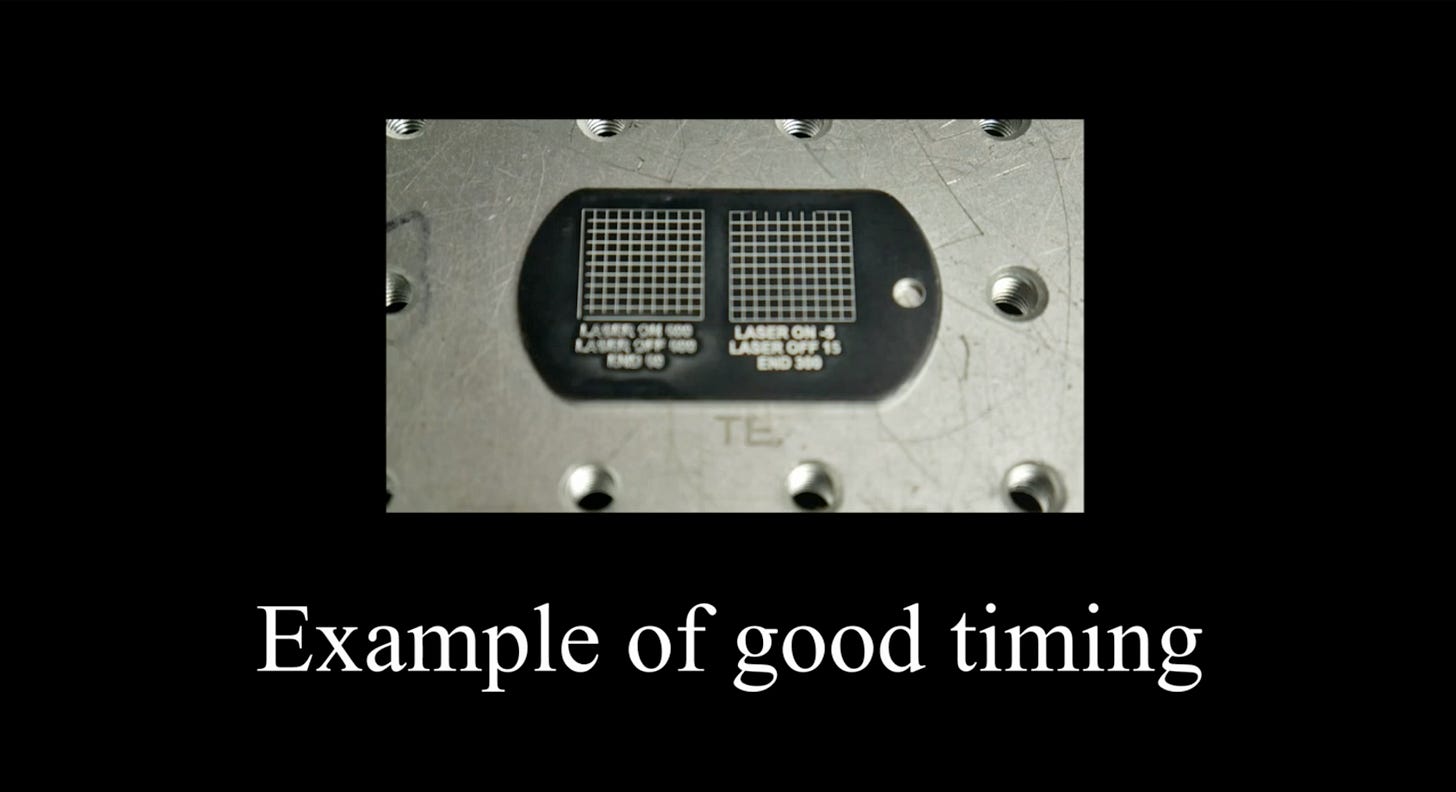
When correctly timed, the result is a beautifully engraved piece with crisp walls and a uniformly flat bottom. This meticulous attention to detail will consistently yield superior results for deep engravings.
Graphical representation illustrating the contrast between incorrectly timed laser engraving (left) where lines are misaligned and the border is broken, versus a perfectly calibrated engraving (right) with crisp lines and a cohesive border.
Step 6: Re-evaluation with Speed Changes and Audible Cues
The relationship between speed and timing is dynamic. Any alteration to the speed setting will necessitate a re-evaluation of the laser activation and deactivation times.
Speed-Timing Dependency: These timings may need to be increased or decreased depending on the outcome of your speed alteration.
Calibrate at Operating Speed: Therefore, conducting this calibration test at the exact speed you intend to operate the tool is paramount. Do not calibrate at one speed and then engrave at another.
Audible Differences: You’ll even discern the difference audibly. Listen closely: the sound of an incorrectly running system will be distinct from the distinct sound of a correctly operating system. The difference is unmistakable, both visually and audibly.
If you are encountering challenges in achieving clean, deep engravings, if the walls appear irregular, or the bottom uneven, it is highly probable that these timing settings are not accurately configured and dialed in. Without precise calibration, your deep engravings will exhibit various imperfections. That concludes our discussion for now. Should you have any inquiries, please share them in the comment section below, or visit our website for more insights at The Transcendent.
Advanced Versions and Upgrades: Modern laser control software often offers more sophisticated algorithms for dynamic power and speed control, which can compensate for minor timing discrepancies. Some also feature integrated visual alignment tools that streamline the calibration process, moving beyond manual observation to augmented reality overlays or automated measurement systems for even greater precision. These advanced features can significantly reduce the time and effort required for precise calibration.
Conclusion
Achieving a pristine deep engrave isn’t magic; it’s meticulous timing. Just like a perfectly choreographed dance between the laser and your material, every “on” and “off” beat needs to be in sync. Get your timings right, and your engravings will look so good, they’ll make your competitors wonder if you secretly hired a tiny, laser-wielding perfectionist. Investing the time in precise calibration ensures not just beautiful results, but also maximizes the efficiency and lifespan of your laser system. Master the timing, master the art!
Frequently Asked Questions
Q1: Why is laser timing so important for engraving? ▼
A1: Precise laser timing ensures that the laser activates and deactivates exactly when needed, leading to clean lines, accurate pattern filling, and consistent engraving depth. Without correct timing, engravings can appear messy, incomplete, or misaligned, significantly impacting the quality of your finished product.
Q2: How often should I calibrate these laser settings? ▼
A2: It’s recommended to calibrate these settings whenever you change your engraving speed, work with a new material, or notice any inconsistencies in your engraving quality. A periodic check (e.g., monthly or quarterly) is also a good practice to ensure optimal performance and prevent issues from creeping in.
Q3: Can these timing settings affect all types of laser engraving? ▼
A3: Yes, these timing settings are fundamental to how your laser interacts with the material. They are crucial for both shallow surface marking (where even slight delays can cause blurry edges) and deep material removal, impacting the quality across the entire spectrum of engraving tasks.
Q4: What if my laser software doesn’t have these specific timing adjustments? ▼
A4: Most professional-grade laser software provides similar parameters, though their names might vary (e.g., “delay,” “compensation,” “corner power,” “pre-fire”). Consult your software manual or contact your laser machine supplier for guidance on identifying and configuring equivalent settings.
Q5: Are there any tools that can help with this calibration process? ▼
A5: While a simple magnifier is highly useful for visual inspection, some advanced systems offer built-in camera-based alignment tools or software features that provide real-time visual feedback to assist in fine-tuning these settings more efficiently. These can include augmented reality overlays or automated measurement systems for greater precision.
Comments
Post a Comment