Unlocking Realistic Renders: Elevating Visuals with Maps
From Flat to Fantastic: A Guide to Normal and Bump Maps
Hello, and welcome to The Transcendent Tech Tips! Today, we’re diving deep into the art of rendering, specifically in KeyShot from SolidWorks, by mastering the creation of compelling normal and bump maps using Photoshop. This guide will transform your 3D models from looking flat and artificial to possessing stunning, lifelike detail.
We’ll start with a straightforward approach, often used to create realistic small-scale objects like coins, a technique that has garnered significant interest for its immediate impact. Later, we’ll explore more elaborate methods to further refine your designs, ensuring every surface tells a story of texture and realism. Get ready to elevate your visual game!
The Magic of Scale: When Dimes Make a Difference
Let’s begin by introducing a product that served as our initial rendering subject: an innovative credit card case. When opened, this item reveals a pair of glasses that can be conveniently worn and then easily returned to their compact form. During its initial rendering phase, this product appeared disproportionately grand and imposing. It was only through the strategic addition of miniature dimes in the lower corner of the composition that its true, remarkably small scale was effectively conveyed. This simple yet powerful trick highlights a crucial aspect of product visualization: sometimes, achieving accurate perception necessitates such comparative elements. Familiar coinage provides an excellent and universally understood means for quick and effective scale demonstration.
A rendered image of a credit card case with miniature dimes placed in the corner to convey its small scale.
Step-by-Step: Rendering Dimes in KeyShot
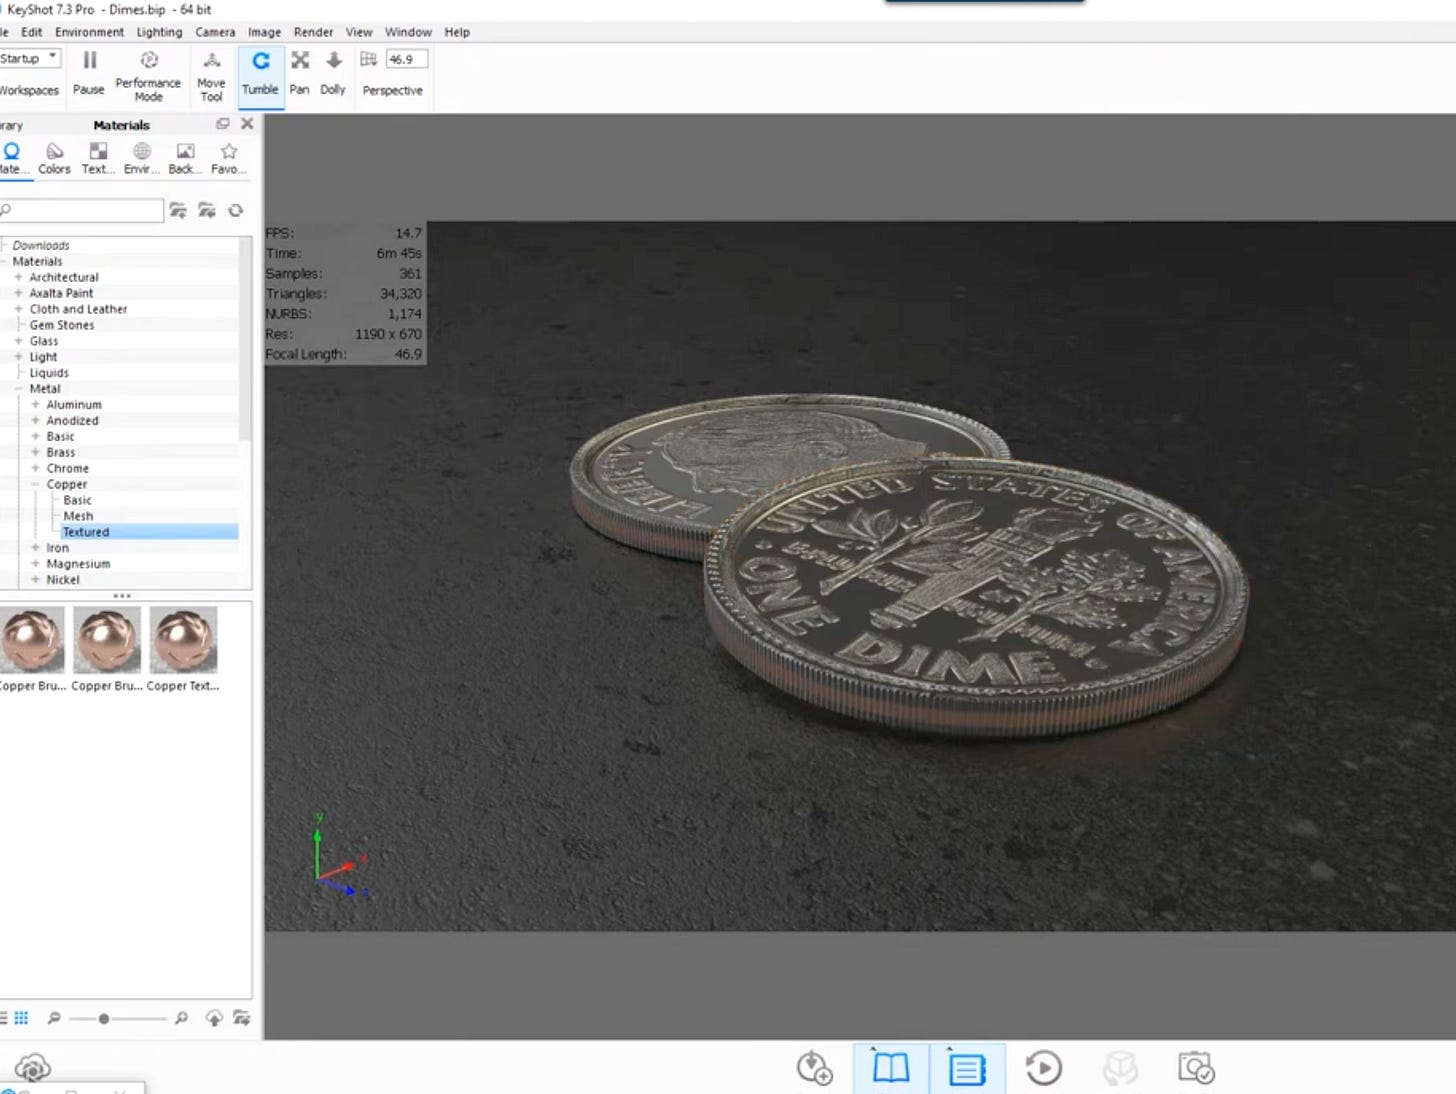
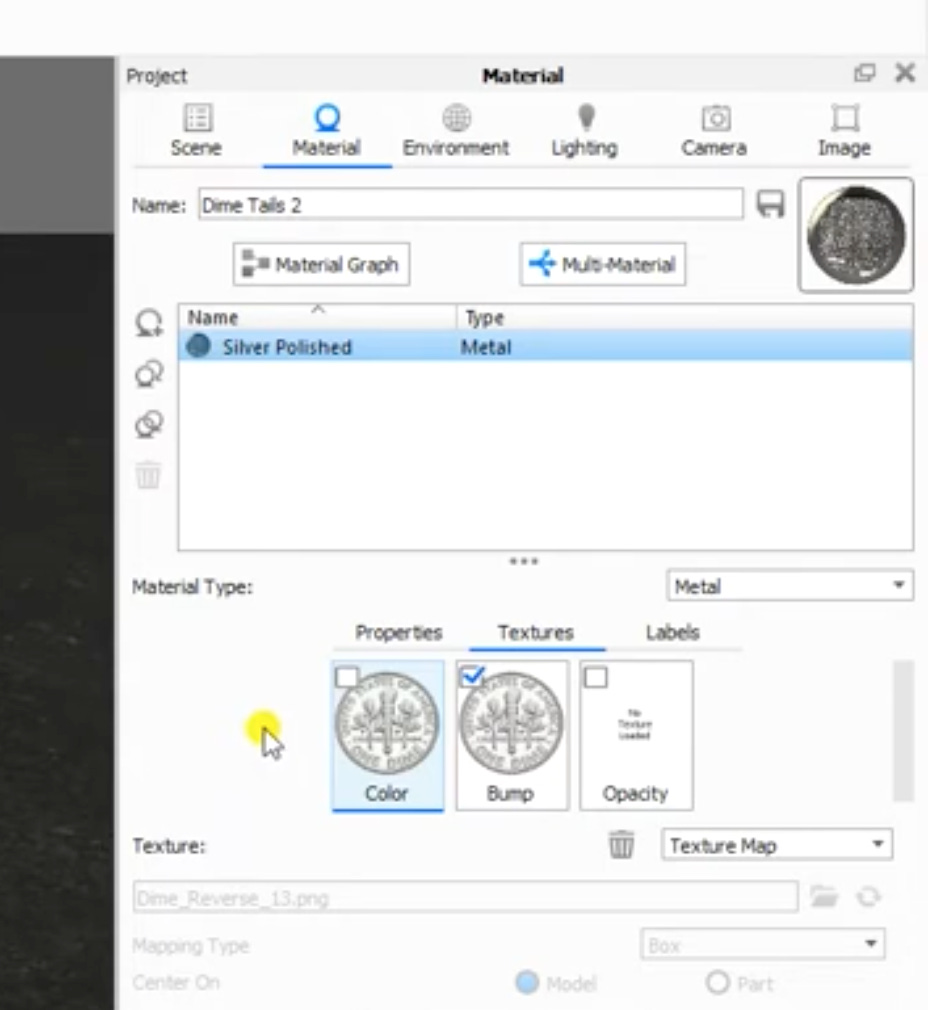
Now, let’s transition into KeyShot to observe how these dimes were meticulously rendered. Examining the scene tree, you’ll notice two distinct dimes, each carefully modeled to comprise an outer ring and an inner disk. Our focus begins on the inner disk, where a texture has been applied—simply an image of a dime sourced online. This image was then adjusted for scale and bump depth to achieve its remarkably realistic appearance.
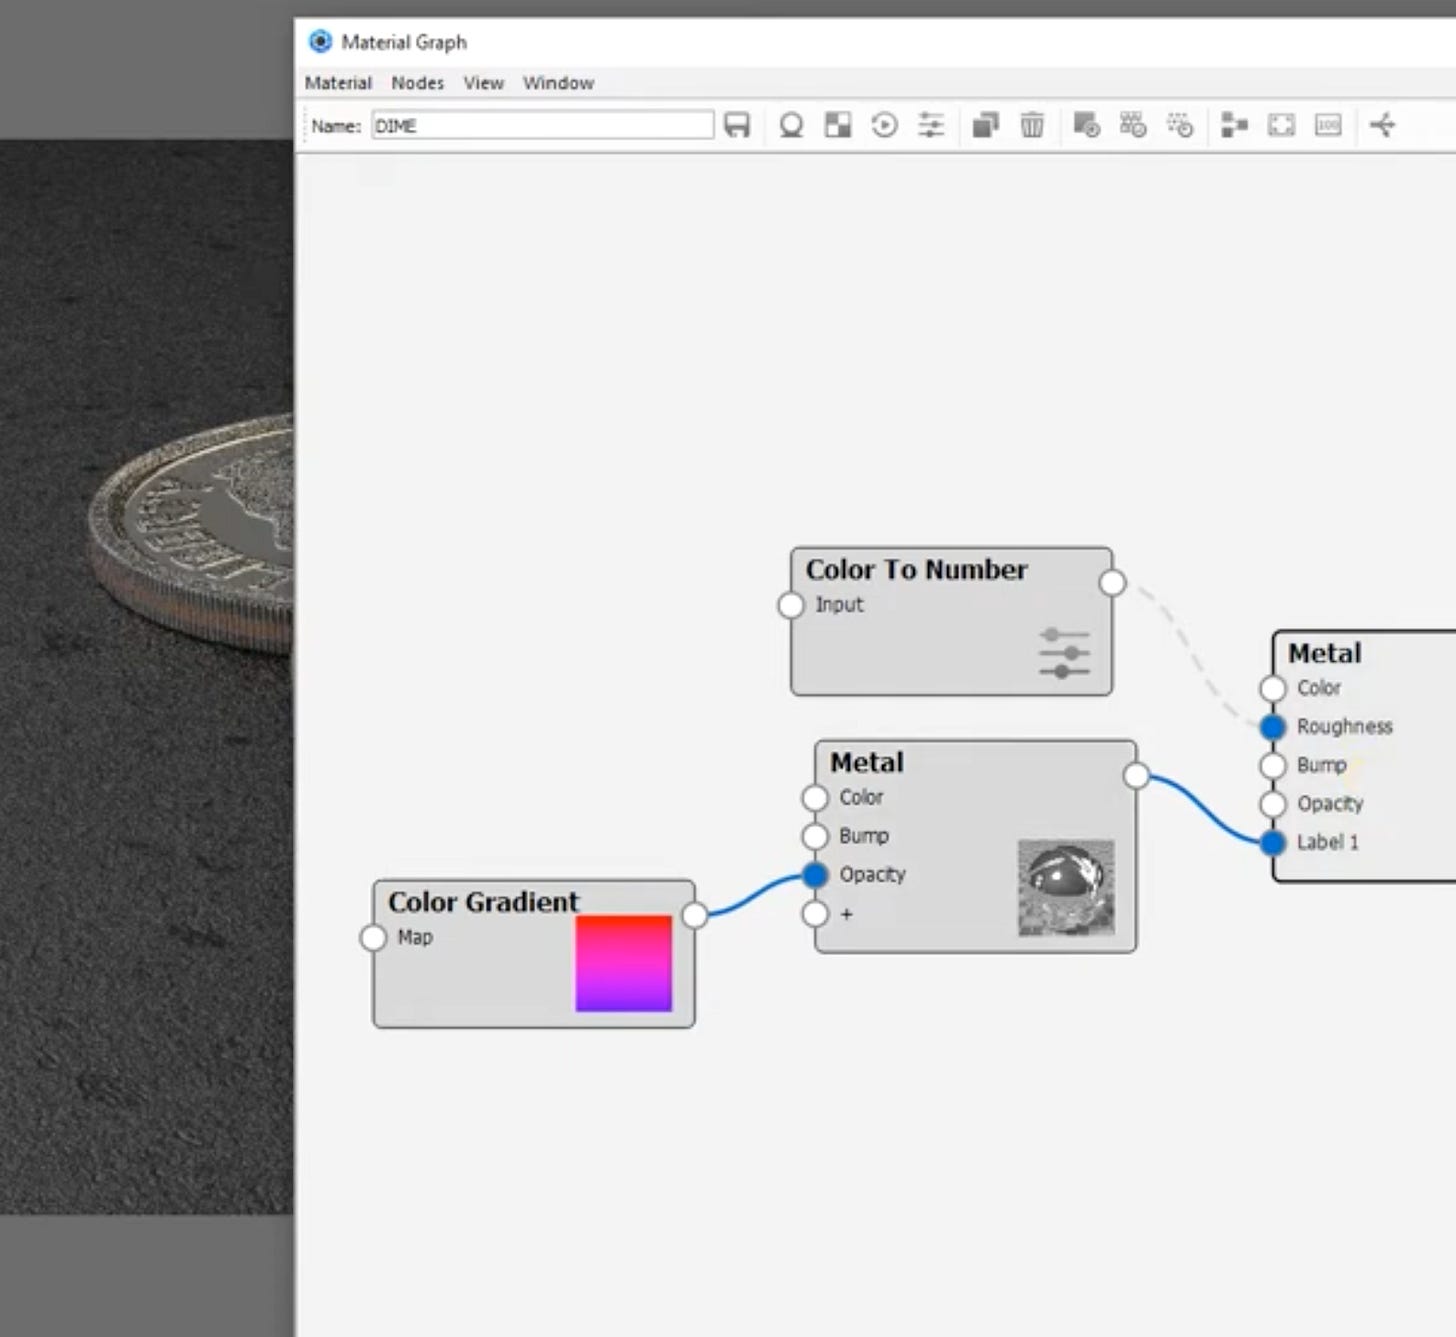
Next, let’s scrutinize the outer disk to understand its material transformation. KeyShot Pro’s advanced material graph feature was employed to visualize and execute this intricate change.
A label and a color gradient have been seamlessly integrated between two different metals. By observing the ‘C’ key visualization, you’ll see a precise white-to-black-to-white opacity mask in action.
This color gradient facilitates a crisp transition between the two metals, which can be finely adjusted to your exact specifications. The primary goal here was to create a sharp delineation, effectively crafting an opacity mask between the nickel silver and copper metals, resulting in a striking and authentic multi-metal finish.
A visual representation of KeyShot’s material graph showing the node connections for applying textures and color gradients to the dime’s outer disk.
<!-- Illustrative Code Graphic for KeyShot Material Graph -->
<svg width=”100%” height=”auto” viewBox=”0 0 400 200” style=”background:#282c34;”>
    <rect x=”20” y=”30” width=”80” height=”40” rx=”5” fill=”#61afef” /><text x=”60” y=”55” font-family=”Arial” font-size=”14” fill=”#fff” text-anchor=”middle”>Metal 1</text>
    <rect x=”20” y=”130” width=”80” height=”40” rx=”5” fill=”#e06c75” /><text x=”60” y=”155” font-family=”Arial” font-size=”14” fill=”#fff” text-anchor=”middle”>Metal 2</text>

    <rect x=”150” y=”80” width=”100” height=”40” rx=”5” fill=”#98c379” /><text x=”200” y=”105” font-family=”Arial” font-size=”14” fill=”#fff” text-anchor=”middle”>Color Gradient</text>
    <rect x=”280” y=”80” width=”100” height=”40” rx=”5” fill=”#c678dd” /><text x=”330” y=”105” font-family=”Arial” font-size=”14” fill=”#fff” text-anchor=”middle”>Material Mix</text>

    <line x1=”100” y1=”50” x2=”150” y2=”100” stroke=”#fff” stroke-width=”2”/>
    <line x1=”100” y1=”150” x2=”150” y2=”100” stroke=”#fff” stroke-width=”2”/>
    <line x1=”250” y1=”100” x2=”280” y2=”100” stroke=”#fff” stroke-width=”2”/>
</svg>
This SVG illustrates the conceptual flow within KeyShot’s material graph, showing how different material nodes (Metal 1, Metal 2) are connected via a Color Gradient to a Material Mix node to create the desired blended effect.
Bump vs. Normal Maps: Understanding the Key Distinctions
To truly grasp the power of these mapping techniques, let’s clarify the distinctions between a bump map and a normal map. While both are instrumental in making surfaces appear textured, they achieve this effect in fundamentally different ways.
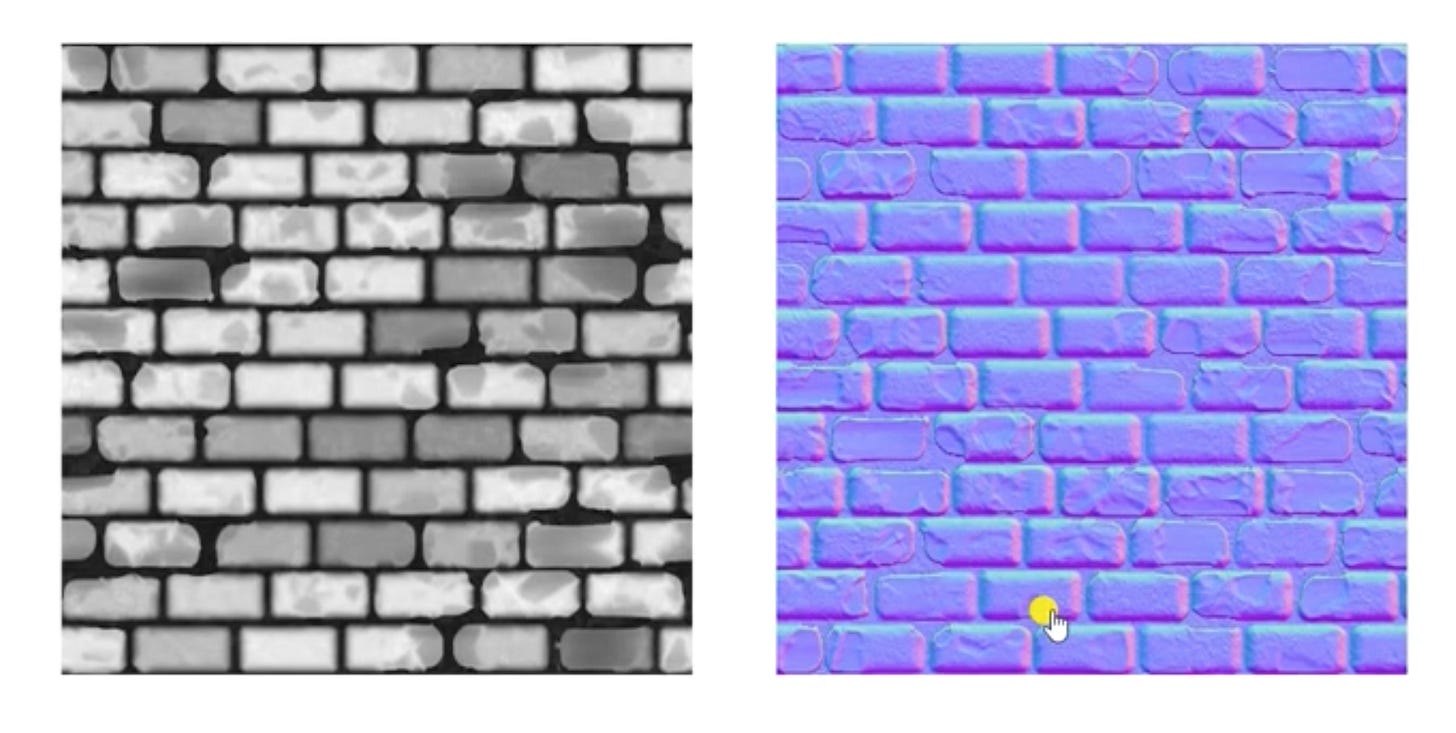
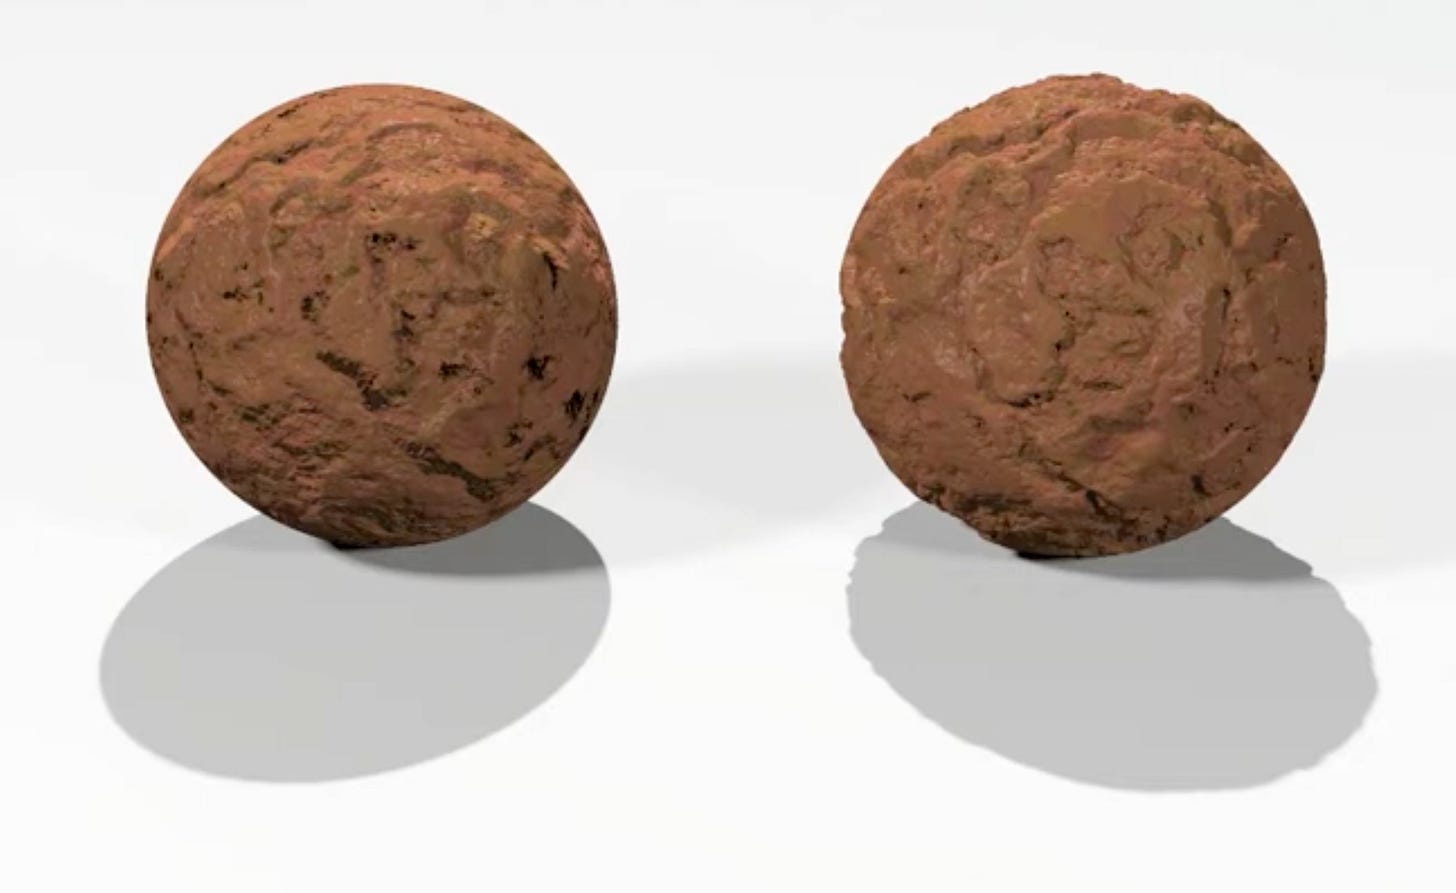
Bump Map: A bump map is a grayscale image, utilizing black, white, and various shades of gray. It works by simulating surface imperfections and details by altering how light interacts with the surface’s shading. Darker areas appear to recede, while lighter areas appear to protrude. The crucial point is that a bump map does not modify the actual geometry of the model; it only creates an illusion of depth by manipulating shadows and highlights. Visually, a bump map tends to exhibit sharp, often angular, geometric edges.
Normal Map: In contrast, a normal map displays a spectrum of colors—predominantly purples, greens, and blues. These colors are not arbitrary; each color represents the direction of the surface normal at that specific point, essentially telling the rendering engine which way the light should bounce off. This directional information allows the normal map to genuinely elevate the surface geometry, creating discernible peaks and valleys. Unlike bump maps, normal maps provide much more accurate data for light reflection, resulting in a significantly more realistic three-dimensional appearance.
Both types of maps dictate how light interacts with object surfaces and both generate highlights and shadows. However, the way they sculpt the surface is fundamentally different. A normal map, by providing true directional data, offers a superior and more convincing illusion of three-dimensional detail, especially when viewed from varying angles.
Crafting Your Own: Generating Normal Maps in Photoshop
Now, we’ll venture into Photoshop to demonstrate the creation of either map type, focusing on the more precise and visually impactful normal map. The first step is crucial: finding a suitable source image. An online image search yielded several quarter images; one with excellent contrast between shadows and highlights against a flat background proved ideal for our purposes. Other photographic attempts often yield unsatisfactory results due to insufficient detail or challenging lighting conditions. We also appreciate the Yosemite reverse side of the coin, given our recent camping trip in that inspiring area, but for this guide, we’ll proceed with the high-contrast front image.
Within Photoshop, with the image loaded at its highest possible resolution, we’ll initiate the transformation process.
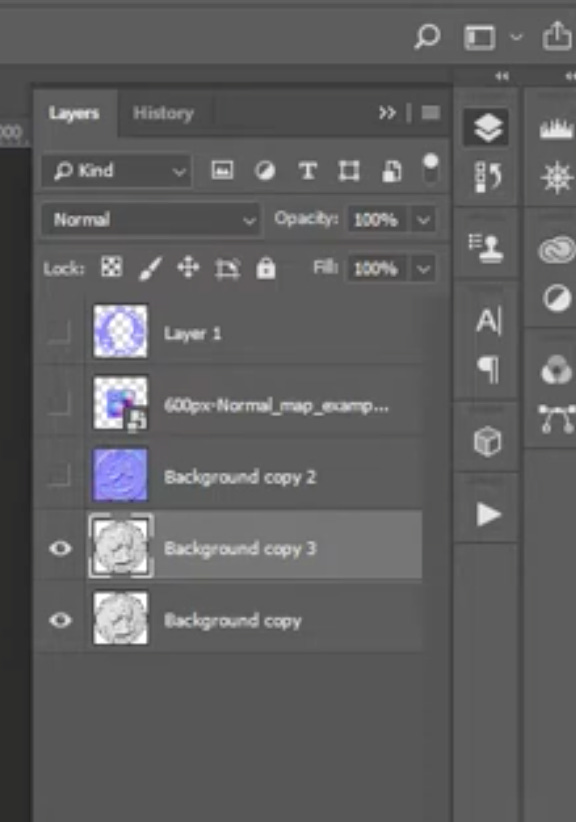
Always begin by creating a duplicate layer to preserve your original image.
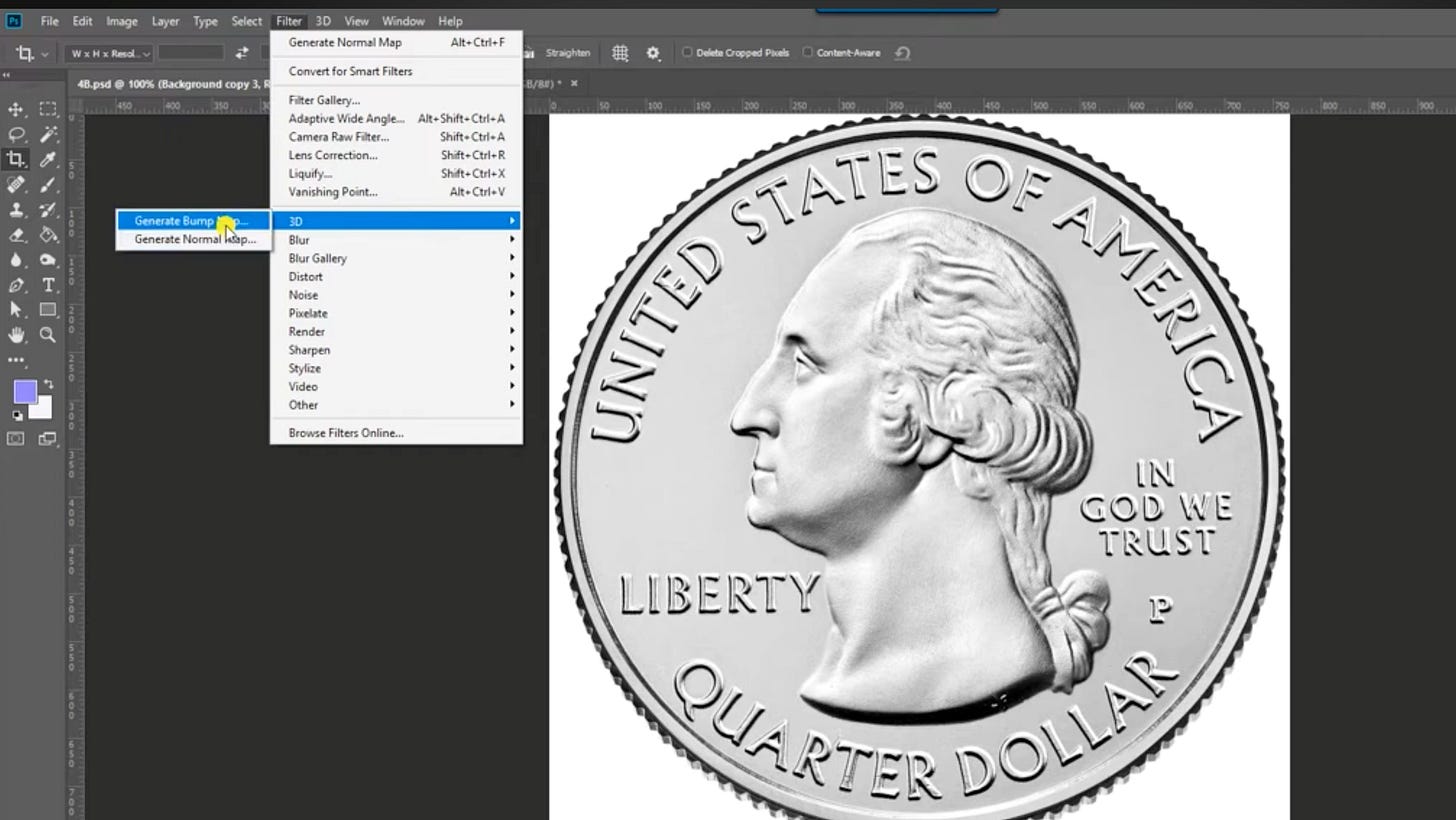
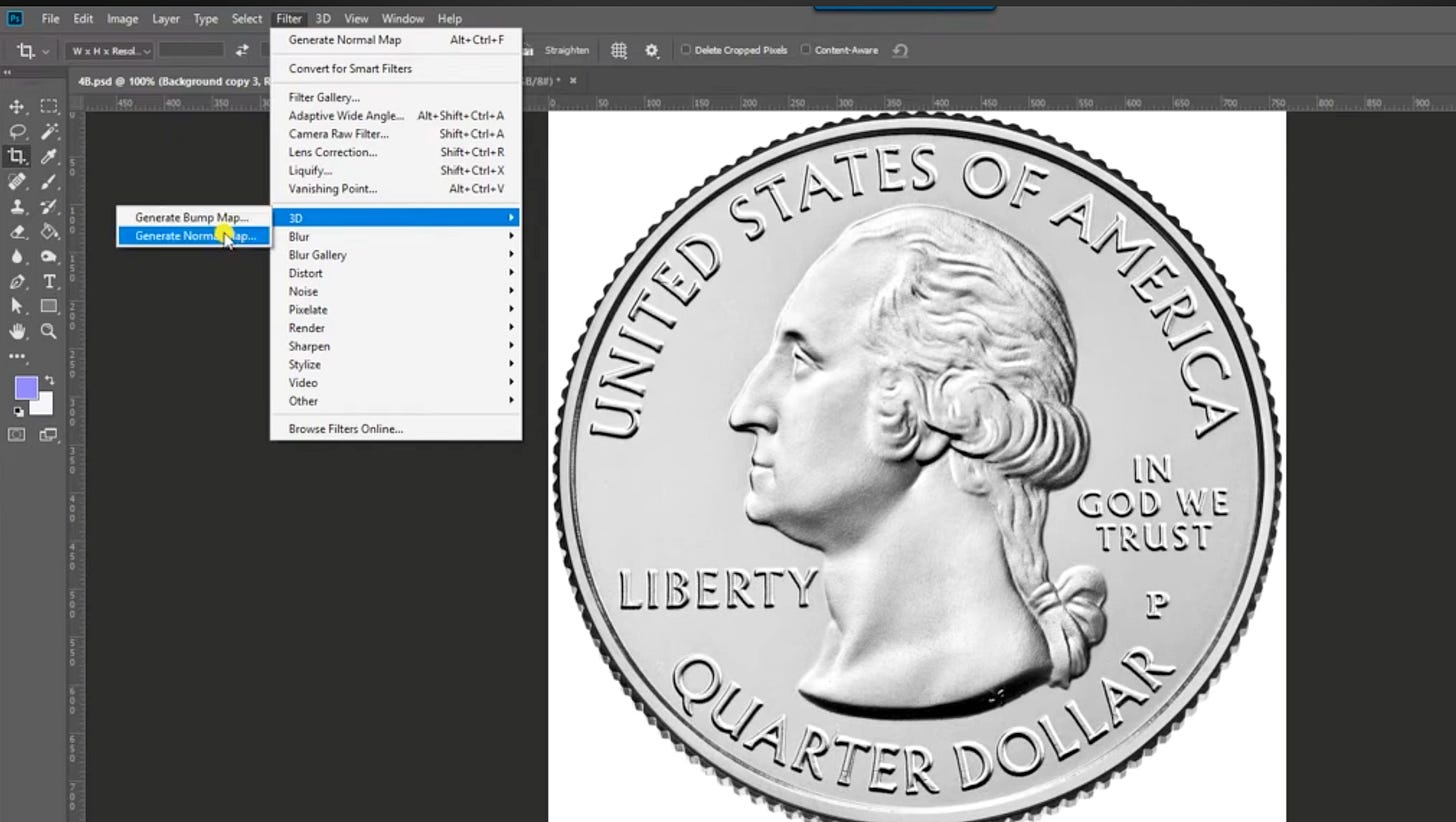
The key maneuver involves navigating to the ‘Filter’ menu, then ‘3D,’ where options to generate either a bump map or a normal map are conveniently presented. Opting for the ‘Generate Normal Map...’ will trigger a dedicated 3D preview box.
The initial spherical preview can sometimes be confusing, making it difficult to assess the map’s effect. For a clearer and more intuitive view of the automated geometry, switching to a ‘cube wrap’ preview allows for a better visualization.
Our objective is to achieve rich, textured detail on the coin’s face while maintaining a smooth, untextured background. While some background painting in Photoshop will later refine the smoothness, our immediate focus is on optimizing the contrast and detail sliders within the normal map generator. Adjusting the blurriness and detail sliders helps refine the appearance of the generated map. There are also controls for ‘contrast’ and ‘detail’ to experiment with, allowing you to fine-tune the resulting texture. One minor limitation of Photoshop’s built-in normal map generator is that text often appears as outlines rather than truly raised features. However, from a reasonable viewing distance, the intricate interplay of highlights and lowlights renders this imperceptible in most rendering scenarios.
A screenshot of Photoshop’s 3D Normal Map filter dialog box, highlighting the cube wrap preview option and detail sliders.
Refining Your Normal Map for Perfection
For this demonstration, a pre-configured layer with preferred settings has been prepared. This initial layer often exhibits rich texture not only on the coin’s face but unfortunately also in the background. To address this undesirable background texture and achieve a smoother appearance, the magic wand tool was strategically used to select the background areas and internal regions of the letters.
This precise selection was then utilized to create a new layer, which was subsequently filled with a flat purple color.
This specific shade of purple is representative of a smooth, untextured normal map; online examples of normal maps illustrate these varied colors, each denoting the direction of surface geometry and effectively guiding light reflection.
By carefully overlaying this smooth purple layer onto the textured normal map, a significantly more realistic outcome is achieved compared to simply having a uniform textured background. The smooth purple shade was simply sampled from an online normal map example using the eyedropper tool, ensuring it matched the standard color for flat surfaces.
A visual comparison of a normal map with a textured background versus one with a smoothed, flat purple background.
Integrating Normal Maps into KeyShot
Let’s now transition back to KeyShot. We’ll edit the material of our coin model to seamlessly integrate our newly created normal map. The material graph, a powerful feature in KeyShot, allows for advanced effects, such as applying scratches as a secondary bump layer. This intricate process involves adding textures, then specifically selecting ‘scratches,’
and finally integrating them with a ‘bump add’ utility to combine multiple bump layers effectively.
This creates a sophisticated layered bump effect, with our meticulously crafted normal map serving as the primary, foundational bump.
We can simply drag and drop our “heads” normal map from its folder directly onto the model and apply it to the bump channel.
If, upon initial application, it appears reversed or inverted, a quick flip adjustment within KeyShot’s material properties will easily correct it.
Crucially, specifying that it’s a ‘normal map’ within KeyShot’s settings significantly enhances the resolution and fidelity of the applied texture. The bump height can also be precisely adjusted; an extreme setting will reveal a deep, exaggerated texture, while a more subtle setting of around 1.5 usually provides the most realistic and convincing results. As the resolution improves, the image becomes clearer and more defined. From a distance, particularly within a larger product scene, this detailed normal map will undoubtedly appear authentic, as extreme, pixel-level detail isn’t always the primary focus for overall realism.
Scaling the image slightly can help eliminate any unwanted ridges or anomalies on the edges of your model; for instance, adjusting the scale to approximately 25.3 can often yield optimal results.
For further refinement, switching to performance mode allows you to observe the changes in real-time, helping you fine-tune the appearance. In the properties panel, roughness can be strategically added or removed to control specular reflections. A perfectly smooth surface would yield harsh, often unrealistic reflections, so introducing a subtle amount of roughness is key to achieving natural light interaction.
KeyShot’s material graph showing the normal map connected to the bump input, with additional nodes for combining scratch textures.
Bonus: Layering Scratches for Enhanced Realism
As a valuable bonus, let’s revisit how scratches were integrated to add another layer of realism. Opening the material graph, you’ll observe the scratches as a second bump layer, working in conjunction with the normal map as the first and primary layer. This dual bump effect is achieved by strategically using the ‘utilities > bump add’ function.
Pressing ‘C’ on the keyboard reveals the distinct scratch pattern in isolation, allowing for precise adjustments.
Parameters like bump height (which, while not directly visible in this preview, controls the perceived depth of the scratches), density (up to five levels can create complex layers of scratches), size, and directional noise (allowing for parallel or non-parallel orientations) can all be meticulously manipulated.
The ‘noise’ setting, in particular, controls the squiggliness or randomness of the scratches, adding to their organic appearance. An extreme application would look as though the quarter was dragged across concrete!
However, for subtle realism, these settings are carefully balanced to achieve just the right amount of wear and tear. Finally, to demonstrate the full effect, we’ll set this up for an animation, simply rotating it twice using the animation wizard. While the preview quality might not reveal every intricate detail, the final render will undoubtedly showcase the intricate and layered surface realism.
A close-up render of the coin showing subtle scratches overlaid on its surface texture.
Conclusion: Your Path to Professional Renders
Mastering normal and bump maps is akin to giving your renders a secret handshake with reality. Without them, your surfaces are flatter than a pancake on a Monday morning. With them, your designs will pop with professional polish, making clients and viewers alike say, “Is that real or KeyShot?” Remember, a little Photoshop magic can make a monumental KeyShot difference!
The continuous advancements in rendering software like KeyShot, including its sophisticated material graph, mean that designers have more power than ever to create hyper-realistic visuals. KeyShot Pro and Enterprise versions, for instance, often include more advanced material graph capabilities, robust nodal setups for procedural textures, and highly customizable material effects that allow for incredibly intricate and realistic surface simulations. By leveraging these tools and techniques, you can ensure your product visualizations are not just accurate, but truly captivating. For more insights and advanced techniques, explore the resources available at The Transcendent.
Summary: Mastering Normal and Bump Maps
StepHeadlineDescription or Statistic1Introduce Product & ScaleDemonstrate real-world scale using comparative elements like dimes (e.g., ThinOptics case rendering).2KeyShot Rendering BasicsApply simple image textures to inner disks; use KeyShot Pro’s material graph for multi-metal transitions.3Differentiate MapsBump maps (grayscale, shading illusion) vs. Normal maps (color-coded, actual geometry elevation).4Photoshop Normal Map CreationUse high-contrast images; Filter > 3D > Generate Normal Map (using ‘cube wrap’ preview).5Refine Normal MapSmooth backgrounds with flat purple layer using Magic Wand and Eyedropper tools for realism.6Integrate into KeyShotDrag-and-drop normal map to bump channel; adjust ‘bump height’ (e.g., 1.5 for realism) and scale (e.g., 25.3).7Layering Details (Bonus)Combine normal map with secondary ‘scratches’ texture using ‘utilities > bump add’ for layered realism.8Final Refinement & AnimationAdjust roughness for natural reflections; set up simple rotations for animation showcase.
Frequently Asked Questions
What is the primary difference between a bump map and a normal map?
A bump map is a grayscale image that simulates surface imperfections by altering shading. A normal map, using color information, provides more accurate directional data for light, resulting in a more realistic three-dimensional appearance with actual raised and lowered geometry.
Can I create bump maps or normal maps from any image?
While you can attempt to create them from various images, those with clear contrast between light and shadow and a relatively flat background tend to yield the best results for detailed surfaces and the most accurate map generation.
What is the significance of setting the image size and DPI/PPI in Photoshop before importing to KeyShot?
Matching the image’s dimensions and resolution (PPI - pixels per inch) in Photoshop with the expected scale in KeyShot helps ensure that the texture maps align correctly and maintain their intended detail without distortion when applied to your 3D model, leading to higher fidelity renders.
Are there any advanced versions or upgrades related to KeyShot’s material graph for rendering?
KeyShot continuously updates its rendering capabilities. Advanced features within the material graph, often found in KeyShot Pro and Enterprise versions, include complex nodal setups for procedural textures, material layering, highly customizable material effects, and powerful scripting options, allowing for incredibly intricate and realistic surface simulations.
How do I ensure my normal map looks realistic and not overly exaggerated?
The ‘bump height’ or ‘normal map strength’ setting in KeyShot is crucial. Start with subtle values and gradually increase until you achieve the desired level of realism. Too high a value can make surfaces appear overly textured or artificial, breaking the illusion of natural detail.



Comments
Post a Comment